Showing posts with label Reports. Show all posts

2022-05-08

XFRX vs FoxyPreviewer

I felt very honored to know that the VFP guru Rick Schummer presented a session - Visual FoxPro Reporting: XFRX vs. FoxyPreviewer in the 2022 version of VFF - Virtual Fox Fest. The organizers were very generous offering a recorded version of all sessions for free for the community in YouTube.


Rick very quickly and impartially shown some of the main features of both tools. 

Regarding FoxyPreviewer, I have some few considerations or remarks. Of course it would be impossible or Rick to know all the possibilities and features available. I just want to make clear that I feel very thankful for the review. And I am totally aware that the documentation needs some updates, and some points could be better explained, so here I take the opportunity to try to clarify some points.


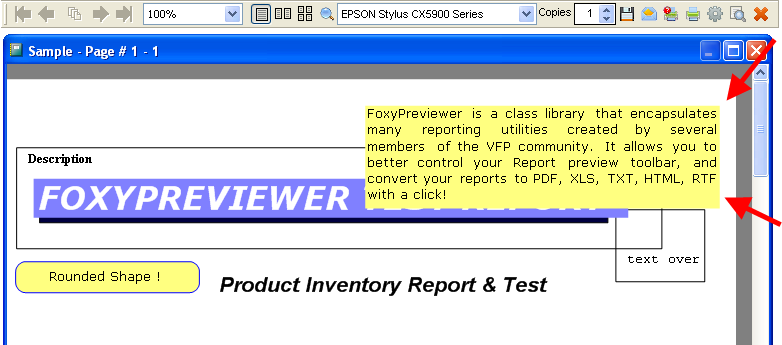
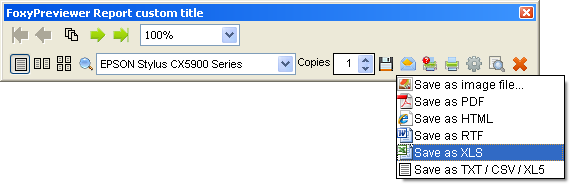
  • Exporting report to an image file - There are 3 available options:
    - OBJECT TYPE 16 - This is the object type related to exporting to image files. Works exactly the same as the others.
    - OBJECT TYPE 20 - This OBJECT TYPE was not discussed in the presentation. It will choose automatically the ReportListener needed to generate the desired output, according to the file extension passed in the TO FILE clause. The available types are: PDF, RTF, HTML, MHTML, GIF, TIFF, EMF, JPG or PNG.
    REPORT FORM YourReport TO FILE MyImageReport.JPG OBJECT TYPE 20
    - Using the FoxyListener.OutputPage method &&Like regular VFP9
  • The truncated numeric fields in reports - He was very precise in his explanation, but I still would like to add some few information from a FAQ related to this:
When I run my reports with FoxyPreviewer sometimes asterisks symbols ********************* appear instead of the field. This was originally working, before using FoxyPreviewer

That happens because FoxyPreviewer uses the SET REPORTBEHAVIOR 90 mode, that uses GDI+ to render the texts. Unfortunately there is a slight difference of the size of the strings between these modes. To fix it, just edit your report and enlarge that field!

You can set the property - lExpandFields to make the report engine show the field numeric value ignoring the field size.
Using "lExpandFields", FoxyPreviewer retrieves the value that overflowed and resends it to the report engine with an enlarged field width.

This is a known issue, and Lisa Slater Nicholls wrote a short blog post regarding it:
Why do report layouts in VFP9 need wider field/expression controls than in VFP8 and earlier?

And here's another interesting text from Lisa, that explains the reason for that:
With REPORTBEHAVIOR=90, the new report engine uses GDI+ to render output, and text string rendering requires more space than plain old GDI.
The Report Designer uses GDI - not GDI+ - to render the report layout components, including all the text strings that you see. So if you visually right-align a label report element, the report designer records the leftmost co-ordinates of the element (the text start position) in the layout.
The length of the string under GDI+ rendering will most likely be greater than what you would think, based on what you see in the Designer.

  • SET COMPATIBLE ON - Oh, this is a known issue, and I had it fixed before. I just don't know why the fix was not included in the last version. I hope to post an update very soon.
  • ReportPreview.App and ReportOutput.App - As shown by Rick, these files are no longer needed if FoxyPreviewer was elected to be your single ReportEngine. I just feel important to add that if you are used to turn it off, you still need those files to restore the Reporting engine to the default VFP9.
  • Excel bug / Enhancements - Please send me your files and I will be very happy and honored to aply your updates to the main distributable version!
  • lOpenViewer property - In one of your samples Rick was using the property ".lOpenViewer = .T." - That means the generated output file would be opened automatically after generated. But the next REPORT FORM command contained the "TO FILE" and "PREVIEW" clauses. The "PREVIEW" clause means exactly the same - to open the file automatically!
    That's a very interesting usage of FoxyPreviewer. If you want your report to be shown in the default PDF viewer instead of a VFP FORM, just use the command:
    REPORT FORM YourReport OBJECT TYPE 20 TO FILE TempFile.pdf PREVIEW
  • The "PrintingPreferences" - Rick told us he feels some kind of frustration with the fact that the report is closed after you change your report settings in that dialog. But that's exactly what the "PRINTER PROMPT" clause does! From that dialog you have the opportunity to change the printer, copies and other settings and call the printer directly.
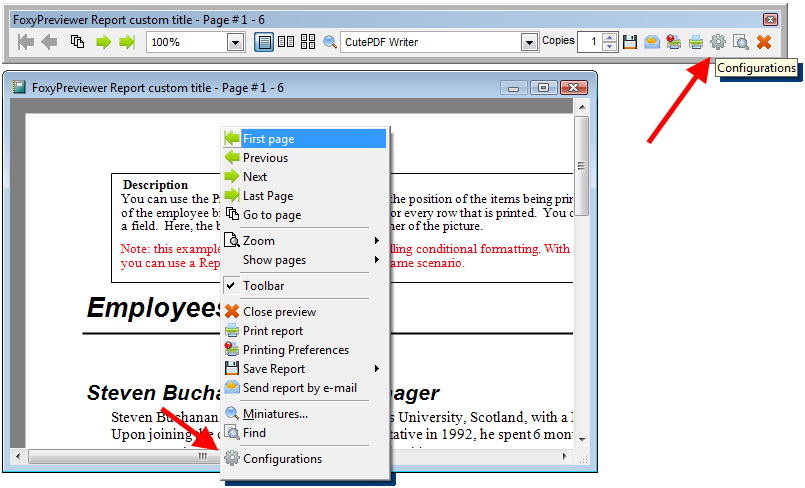
  • Rick was asked about embedding the toolbar in the Preview window. As he said, not in v2.99, but docking the toolbar is possible.
  • David Acuña asked about determining the SMTP server values previously. Yes, that's possible. Just set the "cSMTPServer", "nSMTPPort" and other related properties previously, just after FoxyPreviewer was initialized.
  • Maybe I misunderstood the real meaning of Rick's statement when he said that "The configurations are Global, not Per User". In fact, when you start FoxyPreviewer.App it will load the settings from the file "FoxyPreviewerSettings.dbf". This file is automatically generated after the 1st run of Foxy in that folder. Each of your users can have their own Settings Dbf file! You can save a copy of FoxyPreviewerSettings.DBF when your user logs off. Next time, after logging in and before calling FoxyPreviewer.App replace this file with the desired one. So, you can save a settins file for each of your users! When FoxyPreviewer does not find that DBF in its folder it will create a new one.

    Yes, everyone using that APP on that same machine will use those settings, as he mentioned.

    Here are some new thoughts regarding this, using a not very well documented possibility... There is an option to start FoxyPreviewer in a separate folder:

    Immediately after the user logs in your App, and the user is stored as "m.lcUser", people can try the following:

    lcFolder = ADDBS(JUSTPATH(SYS(16)))
    lcUserFolder = lcFolder + "Users\" + m.lcUser && Make sure the folder exists
    DO FOXYPREVIEWER.APP WITH (lcUserFolder)

    This way, every user will easily have his own Settings table. What do you think?


  • Distributing FoxyPreviewer - People just need ONE SINGLE FILE - FoxyPreviewer.App. And there is no need to install it. Just a simple"DO FOXYPREVIEWER.APP" at the beginning of your EXE code and it's done! The recommended is to store it at the same folder of your EXE, and make sure that folder will allow Foxy to create a subfolder and save some custom configuration files.

2021-03-23

Saving a VFP Report at a higher resolution with FoxyPreviewer

VFP9 brought the possibility to save our reports as images, using the ReportListener class, and the OutputPage method:

loListener.OutputPage(lnPage, "\MyReportImage.PNG", 104) && PNG file type


This brings us some useful, but lousy images regarding quality. For instance, the Sample "COLORS.FRX" brings me a 816 x 1056 pixels image - a really poor quality image, if we are thinking of printing or manipulating it further.


But the "OutputPage" method also allows us to draw the report page at any desired image size, by passing a GDI+ Graphics handle instead of the file name widely used.

Here is the working sample - notice that the report engine works only with 96 DPI, so to have better quality, you need to save in bigger dimensions.

Use the function GETREPORTPAGEEX to get your higher resolution reports, here is the parameter list

  • tcFile - The destination image file name
  • toListener - The ReportListener associated with the current report
  • tnPage - The report page number
  • tnEncoder - 100=EMF, 101=TIFF, 102=JPEG, 103=GIF, 104=PNG, 105=BMP
  • tnScale - the scale factor to be applied to the image. 1=Default (low quality), 10=Super high quality
  • tnWidth - The output image width (optional, if using the "tnScale")
  • tnHeight - The output image height (optional, if using "tnScale")


DO FoxyPreviewer.App

LOCAL loListener AS REPORTLISTENER
LOCAL lcFile, lnPage, lnFileType
m.loListener			  = CREATEOBJECT("FoxyListener")
m.loListener.LISTENERTYPE = 3

REPORT FORM (ADDBS(_Samples) + "Solution\Reports\Colors.FRX") OBJECT m.loListener

m.lnFileType = 104 && PNG
	&& 100 - EMF
	&& 101 - TIFF
	&& 102 - JPEG
	&& 103 - GIF
	&& 104 - PNG
	&& 105 - BMP

FOR m.lnPage = 1 TO m.loListener.PAGETOTAL
	m.lcFile = "c:\temp\Test__" + SYS(2015) + "__" + ALLTRIM(STR(m.lnPage)) + ".png"
	GetReportPageEx(m.lcFile, m.loListener, m.lnPage, m.lnFileType, 5) && 5 times bigger image than default
	* For the default lower quality image, use:
	*   loListener.OutputPage(lnPage, "c:\Test" + ALLTRIM(STR(lnPage)) + ".png", lnFileType)
ENDFOR
m.loListener = NULL
RETURN


PROCEDURE GetReportPageEx(tcFile, toListener AS REPORTLISTENER, tnPage, tnEncoder, tnScale, tnWidth, tnHeight)
	LOCAL lhGfx
	*!*	100 - image type EMF
	*!*	101 - image type TIFF
	*!*	102 - image type JPEG
	*!*	103 - image type GIF
	*!*	104 - image type PNG
	*!*	105 - image type BMP
	m.tnEncoder	= EVL(m.tnEncoder, 104) && Default = 104-PNG
	m.tnScale	= EVL(m.tnScale, 1)
	IF EMPTY(m.tnWidth)
		m.tnWidth  = m.toListener.GETPAGEWIDTH()  / 10 * m.tnScale
		m.tnHeight = m.toListener.GETPAGEHEIGHT() / 10 * m.tnScale
	ENDIF

	#DEFINE Gdiplus_PixelFormat_32BppArgb		0x0026200a
	#DEFINE OUTPUTDEVICETYPE_GDIPLUS 			1

	LOCAL loBMP AS GpBitmap OF ADDBS(HOME()) + "/FFC/_GDIPLUS.VCX"
	m.loBMP = NEWOBJECT("GpBitmap", ADDBS(HOME()) + "/FFC/_GDIPLUS.VCX")
	m.loBMP.CREATE(m.tnWidth, m.tnHeight, Gdiplus_PixelFormat_32BppArgb)

	LOCAL loGfx AS GpGraphics OF ADDBS(HOME()) + "/FFC/_GDIPLUS.VCX"
	m.loGfx = NEWOBJECT('GpGraphics', ADDBS(HOME()) + "/FFC/_GDIPLUS.VCX")
	m.loGfx.CreateFromImage(m.loBMP)
	m.lhGfx = m.loGfx.GetHandle()

	m.toListener.OUTPUTPAGE(m.tnPage, m.lhGfx, OUTPUTDEVICETYPE_GDIPLUS, 0, 0, m.tnWidth, m.tnHeight, 0, 0, m.tnWidth, m.tnHeight)
	m.loBMP.SaveToFile(m.tcFile, "image/png")
ENDPROC

2018-05-24

FOXYPREVIEWER NEW HOME - www.foxypreviewer.com

As everybody knows, the cool and friendly structure of CodePlex is no longer available, so I decided to create a separate home for it.

From now on, all the releases, documentation, FAQS and more information will be available at www.foxypreviewer.com

Although CodePlex is still available as "ReadOnly", some people had difficulties downloading the latest release and documentation, so some other helpful guys have published some versions of these files. I would like to ask you to remove them, to avoid offering deprecated versions, because that makes it extremely difficult for all of us to provide support for old versions.

I have already a new version with some cool new features ad fixes, and I hope to publish it very soon.

See you at www.foxypreviewer.com !!!

2018-05-11

REPORTLISTENER HEADQUARTERS AND SAMPLES

REPORTLISTENER HQ

REPRODUCED FROM THE CAPTURED VERSION FROM THE WEBARCHIVE
www.reportlistener.com from 2007-08-23


Visual FoxPro 9.0 includes several major improvements to the crusty old Report Writer, making it a powerful, dynamic tool. One the primary ways to extend the capabilities of the Report Writer is through custom Report Listener classes. These classes allow you to hook into the report generation process to customize the appearance of your report. This site is dedicated to the sharing of custom Report Listener classes among the members of the Visual FoxPro community.


Available downloads: 


Converting General fields to Blob fields

 - The new Blob data type in VFP 9 is a General killer--they're much easier to work with than General. Unfortunately, there isn't an easy way to convert the contents of existing General fields into Blob fields; once you've put an image into a General field, it's all but impossible to get it back out. GeneralToBlobListener is a ReportListener subclass that handles this task painlessly.
Last updated: 2005-01-08 
Author: Doug Hennig
Download Converting General fields to Blob fields (Freeware - 7.2K)


HTML Preview with a Navigation Pane

 - Uses a custom ReportListener class and a helper class that work together to generate the output in HTML and GIF files. This HTML file is gererated through an XSL Transformation over a XML document that keeps some metadata of the preview output.
Last updated: 2004-11-03
Author: Fabio Vazquez
Download HTML Preview with a Navigation Pane (Freeware - 6.8K)


Using the GDI+ FFCs to work with output

 - This sample uses the GDI+ foundation classes to change the StringTrimming behavior for the field in the detail band of the report. Note that you have to make one manual change to the report as specified. 
Last updated: 2004-11-02 
Author: Garrett Fitzgerald 
Download Using the GDI+ FFCs to work with output (Freeware - 4.7K)


Font List

 - This code and simple listener generates a report-based list of the fonts on your system. 
Last updated: 2004-11-01 
Author: Garrett Fitzgerald 
Download Font List (Freeware - 1.1K)


QuickFRX2PDF

 - QuickFRX2PDF, this class will allow you to generate PDF files in a really fast and easy way. New version, will generate real PDF Files in a smaller size and faster. Help file included and sample form updated.
Last updated: 2005-10-10 
Author: Luis Navas 
Download QuickFRX2PDF (Commercial - 1MB) 


QuickVFPPdf

 - Taking advantage of GDI+ usage in Visual FoxPro 9 this class generates a PDF Document that will look exactly as your original report. Limitations: All the content of the report will be exported as an image to the PDF document (this will change in future versions). Works only on Visual FoxPro 9 (this will change in future versions).
Last updated: 2005-06-07 
Author: Luis Navas 
Download QuickVFPPdf (Commercial - 1MB) 


Report Preview/Output Engine

 - Report Preview/Output Engine - Written by AMaximum (Erlikh Maksim, Novorossiysk, Russia)
Last updated: 2005-05-04 
Author: Erlikh Maksim 
Download Report Preview/Output Engine (Freeware - 84K)

2012-08-17

FoxyPreviewer latest changes in v2.99

IMPORTANT FIX

I think I finally caught one of the most challenging bugs we had in FoxyPreviewer, that made the reports render only the data from the first field in some reports that used Private DataSessions, and some other specific settings.

I received complaints from 4 people in the last year, but nobody could give me any clue about what was going on, or to help me to reproduce the problem. I finally found a good soul, Flavio Cardoso, from the brazilian VFP user group, who had the same issue, and provided the needed information, and worked with me during some hours to solve this JUMBO issue.

So, please, test the latest version with care v2.99m or higher, and let me know how it goes!

Below, some information about the latest changes in FoxyPreviewer, in case you missed:


v2.99m - 2012-08-17

** VERY IMPORTANT FIX **In some cases, when using Private datasessions, depending on the environment settings
some reports rendered the data of the 1st field only. If you had this issue before, please test this release


Other fixes / improvements

Fix: FoxyPreviewer disabled form's close button - http://foxypreviewer.codeplex.com/workitem/9275
Fix: Rearranged the order of the buttons in the preview toolbar and context menu, in order to make the buttons to appear at the same order in both places, thanks to Mark Winston

New properties:
- “nThermFormWidth” – numeric, specifies the width of the Thermometer form. Useful when a big caption is needed. Works only if “.nThermType = 2 && Windows default”
- “lShowFileFormatIcons” - logical, allows hiding the file format icons in the context menus.

Cool information:
Mark Winston, brought to my knowledge that "sec(s) or secs" is not the correct abreviation for the word "seconds". After a small research, we found that just an "s" is the correct way to abreviate. I will not change the default behavior, because it's the way VFP originally used in the Thermometer form, that shows the report progress. If you want to change it, it's very easy, just try:

DO FoxyPreviewer.App
_Screen.oFoxyPreviewer._SecondsText = "s by Mark Winston"
REPORT FORM LOCFILE(_Samples + "\Solution\Reports\Wrapping.frx") PREVIEW


BTW, You can play changing these properties below as well, if you prefer:

? _Screen.oFoxyPreviewer._CancelinStrText
? _Screen.oFoxyPreviewer._AttentionText
? _Screen.oFoxyPreviewer._CancelQueryText
? _Screen.oFoxyPreviewer._InitStatusText
? _Screen.oFoxyPreviewer._PrepassStatusText
? _Screen.oFoxyPreviewer._SecondsText


v2.99c - 2012-08-08
- Fix in PDF listener, adjusting some constant values, in order to store metadata correctly.
http://foxypreviewer.codeplex.com/workitem/9434 - Thanks to Martin SYkora
- Fix in RTF Listener, now making the default language according to the codepage selected (originally was always forcing to Russian)
- Fix for issue: http://foxypreviewer.codeplex.com/workitem/9506
- New property: “cFaxPRG”, allowing sending faxes from FoxyPreviewer using your custom Faxing procedures. Notice that FOxyPreviewer does not bring any internal code to manage faxes. With this property, I'm just opening a "door" to allow you to receive some info from FoxyPreviewer and send your documents using your Faxing app.
To make Foxy show a "Send to fax" button in the email form, you need to fill the property “cFAXprg”, with the name of a PRG that will be responsible of sending the fax, for example:


_Screen.oFoxyPreviewer.cFaxPrg = “mySendFax.prg”

Then, your “MYSENDFAX.PRG” program MUST start with a LPARAMETERS statement, that will receive from FoxyPreviewer some needed parameters to send your fax:


LPARAMETERS tcFile, tcFaxNumber, tcHTMLBody, tcSubject* Where:
* tcFile = the file name that brings your report
* tcFaxNumber = the fax number that your client will fill in the email field
*               in the email form
* tcHTMLBody = the text that your client wrote in the email form
* tcSubject = the subject filled


v2.99 - 2012-06-20

- Included "lSilent" property in simplified mode
- Fix in PDF listener, allowing images embedded in the EXE to be shown in the exported files
- Fix in PDF and RTF listener, allowing merging reports using OBJECTTYPE 10 (Other types not available yet)
- Included new PRG: "FOXYGETIMAGE.PRG". Include this file in your EXE project if you have images embedded in your EXE that you want to appear in your report. This may bring some security issues to your EXE, because this program will allow FoxyPreviewer to access the embedded images of your EXE.
- Fixed Issue "Emailto, subject and file name settings do not update" http://foxypreviewer.codeplex.com/workitem/9362
- Fix in ExcelListener: to allow flexible Currency and ()'s for Negative - by Rick Bean
- Fix in Report exporting, when some objects were not respecting the original report position (front and back) http://foxypreviewer.codeplex.com/workitem/9276


FoxyPreviewer Links

2012-02-27

Watermark your reports with FoxyPreviewer

Adding watermarks to reports is something that I've already blogged years ago during the development of GdiPlusX. In those times, we needed to create a specific ReportListener to manage the report pages, and draw the watermarks. We needed another external library, GdiPlusX, that was responsible for drawing at the report surface, and for applying some special effects to the images, such as transparencies and converting to grey scale.

Finally, we have this feature in FoxyPreviewer too ! That means that from now on, you can add watermarks to your reports without having absolutely any knowledge about GDI+ or ReportListeners, just by setting some few properties! In fact, by filling just one property you can have watermarks in all pages of your reports. In fact, this feature was asked by many people, but I had to postpone it because I had to implement to the original Gdi+ classes some new classes and functions, to create the transparencies and grey-scale effects. If you're curious, and want to check for these functions, have a look at the file pr_gdiplushelper.prg in the sources folder.

The usage is, as always, super simple. The only requirement is that you use FoxyPreviewer in the simplified mode.

Related properties:

cWatermarkImage - character, the name of the WM image. Important: this image MUST be stored locally, CAN'T be embedded in your EXE, obligatory property if you want to show the watermark. To remove the watermark from the next reports, just store an empty value to this property.

nWatermarkType - numeric, 1 = Colored (default), 2 = Converts the source image to grey scale, optional property

nWatermarkTransparency - numeric, from .10 to 1, default = 0.25, the transparency level of the WM image; 1 = Opaque, optional property

nWaterMarkWidthRatio - numeric, default = 0.75, the width size in proportion of the watermark in the report page, optional property

nWaterMarkHeightRatio  - numeric, default = 0.75, the height size in proportion of the watermark in the report page, optional property


Usage:

DO FoxyPreviewer.App
* Adding watermarks to reports
_Screen.oFoxyPreviewer.cWatermarkImage = ADDBS(HOME()) + "Graphics\Gifs\Morphfox.gif"
_Screen.oFoxyPreviewer.nWaterMarkType = 1 && 1 = Colored (default), 2 = B&W

_Screen.oFoxyPreviewer.nWatermarktransparency = .30 && (0-1) Transparency, 0 = Transparent, 1 = Opaque
_Screen.oFoxyPreviewer.nWaterMarkWidthRatio = .75 && (0-1) Proportion that the WM will occupy in page width
_Screen.oFoxyPreviewer.nWaterMarkHeightRatio = .75 && (0-1) Proportion that the WM will occupy in page height

REPORT FORM LOCFILE(_Samples + "\Solution\Reports\Colors.frx") PREVIEW


If you only set the "cWatermarkImage" property to a valid image file existing on the disk, you'll have your first watermark.
To reset your reports to the original settings, without the watermark, just clear the value of the property '.cWatermarkImage = "" '.


Samples:

Below you can see how the watermarks will appear, depending on the property values that you choose:


1 -
.nWatermarkType         = 1 && 1 = colored ; 2 = greyscale
.nWatermarkTransparency = 1 && 0 = transparent ; 1 = opaque
.nWatermarkWidthRatio   = 0.90 && 0 - 1
.nWatermarkHeightRatio  = 0.90 && 0 - 1 


2 -
.nWatermarkType         = 1 && 1 = colored ; 2 = greyscale
.nWatermarkTransparency = 0.25 && 0 = transparent ; 1 = opaque
.nWatermarkWidthRatio   = 0.50 && 0 - 1
.nWatermarkHeightRatio  = 0.50 && 0 - 1 


3 -
.nWatermarkType         = 2 && 1 = colored ; 2 = greyscale
.nWatermarkTransparency = 0.10 && 0 = transparent ; 1 = opaque
.nWatermarkWidthRatio   = 1.00 && 0 - 1
.nWatermarkHeightRatio  = 1.00 && 0 - 1


4 -
.nWatermarkType         = 2 && 1 = colored ; 2 = greyscale
.nWatermarkTransparency = 0.25 && 0 = transparent ; 1 = opaque
.nWatermarkWidthRatio   = 0.75 && 0 - 1
.nWatermarkHeightRatio  = 0.75 && 0 - 1


2012-02-25

Full justified texts in Reports with FoxyPreviewer

A relative old feature, but that I missed to blog about is the possibility of adding justified texts in your report fields.
In FoxyPreviewer, that's really very very simple !
  • Select the field that you want to justify
  • Double-click that field to access the properties dialog
  • Select the "Other" Tab
  • Click "Edit User Data" button
  • Add the "<FJ>" tag in the textbox
That simple !
When you run your report, that field will appear justified.
This setting works also when you export your report to PDF, RTF and HTML!


2012-02-22

FoxyPreviewer – HTML like formatting!

FoxyPreviewer brings another cool facility, that allows you to draw your texts in the report surface (and export it) having control on each word. Forget those old workarounds, generating images to draw some texts in your reports or even embedding RTF controls in your reports !

This brings a super cool new feature, allowing you to add some basic HTML texts to your fields. This means that you can from now on determine how EACH WORD in your field should be formatted!
See the image below, all the text is in ONE SINGLE FIELD !


How to do it ?
Very very simple:
  1. Open your report, in Edit mode
  2. Double-click the field that you want to add the tagged formatting. This will open the field properties dialog
  3. Click on the "Other" tab
  4. Click on the "Edit user data..." button
  5. Add the string "<TF>" as shown in the picture below:


And just add the HTML code below to that field:


The search capabilities are kept, and exporting to PDF returns an excellent output as well.
Here is the list of the available TAGS that you can use:

Feature Opening Tag Closing Tag
bold <b> </b>
italic <i> </i>
underline <u> </u>
strikethru <s> </s>
text color <color=rgb/ncolor >
<c= >
</color>
</c>
text backcolor <highlight=rgb/ncolor>
<h=rgb/ncolor>
<backcolor=rgb/ncolor>
</highlight>
</h>
</backcolor>    && in FP v3
font name <fontname=”name”>
<fname=”name”>
</fontname>
</fname>
font size <fontsize=n>
<fsize=n>
</fontsize>
</fsize>
whole font style <fontstyle=”BIUS”>
<fstyle=”BIUS”>
</fontstyle>
</fstyle>
force new line (CRLF) <br>
CHR(13)
CHR(10)
CHR(13) + CHR(10)
NB: color could be stored a number with RGB()
NB: could prevent transform if '</' not in string


Special thanks to Eduard Alexandru, from Bucarest, Romania, for his essential help in this feature, help in discussions and for providing some procedures to deal with the tagged texts.
This feature still needs some tests. It is possible that you find some tags that are not being considered, please me!
Check the sample SAMPLE_TF.FRX in the latest FoxyPreviewer release to play with the new features.

2012-02-06

FoxyPreviewer email configurations

FoxyPreviewer brings 4 ways for you to send emails:

1 – MAPI - Uses the WinAPI MapiSendMail to try to send the current report as an attachment.
This setting sends a standard message, with one or more attached files and a cover note. The cover note is a dialog box that allows the user to enter a list of recipients and an optional message and other sending options. It will open a dialog email sending message, waiting for a user interaction. The message will not be sent automatically. It’s up to the user to veryfy the information ofthe message and to click at the “Send” button. 
This function tries to establish a session using the messaging system's shared session. If no shared session exists, it will fail sending the message.
This works pretty well if you have your default account set using MS Outlook Express, MS Outlook or Windows Live Mail. Definitely, it’s the easiest way to send your messages, because this way, FoxyPreviewer will use the default Email configuration of the computer.

2 - MAPI Alternative – Uses the WinAPI MapiSendDocuments to try to send the current report as an attachment.
The MAPISendDocuments function sends a standard message with one or more attached files and a cover note. The cover note is a dialog box that allows the user to enter a list of recipients and an optional message and other sending options.
This function tries to establish a session using the messaging system's shared session. If no shared session exists, it will fail sending the message.
This works pretty well if you have your default account set using MS Outlook Express, MS Outlook or Windows Live Mail. Definitely, it’s the easiest way to send your messages, because this way, FoxyPreviewer will use the default Email configuration of the computer.
Although MS says that “The use of this function is discouraged. It may be altered or unavailable in subsequent versions of Windows.”, it’s been working well in all OS’s, from WinNT to WinSeven

3 – Custom Procedure
You can use your own procedure to send the current report. use foxypreviewer property "cEmailPrg", and fill it with the name of the prg responsible for sending emails. This PRG receives as a parameter the file name of the file created that you will send as attachment. Have a look at the samples provided, the file mysendmail.prg shows how you would need to make your custom procedure.

4 – CDO
Uses the CDO2000 component included in windows 2000 and later. It allows you to send emails using a SMTP server. All settings must be accurate in order to make this work. For example, below is the configuration for a “Hotmail” or “Live” account to send emails. You may check also in Sergey Berezniker's blog for more information on how to send using MSN, YAHOO or GMAIL email messages using CDO: http://www.berezniker.com/category/topic/email


People always send messages in forums asking how they should make these configurations. In fact, they change from server to server, the best you can do is to check the Email server that you are using, and get the right configurations for SMTP Server, SMTP Port and SSL Connection.
Thanks to MK Sharma, from Foxite, I found this link, that brings some SMTP general information about several servers: http://mynokiamobile.blogspot.in/2008/01/smtp-pop3port-settings-for.html
And here is a list of servers with some common configurations for people who use Brazilian servers:
http://superlogica.com/faq/00259

Please note that I did not test any of the settings below, please make your tests!

Server SMTP adress Port(s) Use SSL
HOTMAIL / LIVE
smtp.live.com
25
TRUE
YAHOO
smtp.mail.yahoo.com
25 or 465
TRUE
GOOGLE
smtp.gmail.com
465 or 25
TRUE
AOL
smtp.aol.com
NETSCAPE
smtp.isp.netscape.com
25
MSN
smtp.email.msn.com
REDIFF
smtp.rediffmailpro.com
UOL
smtp.uol.com.br
25
TRUE
UOL smtps.uol.com.br 587 or 465 TRUE

2012-02-02

FoxyPreviewer v2.96 updates

Updates for FoxyPreviewer v2.96
http://www.foxypreviewer.com

This release brings a new cool feature, allowing you to print the same report twice in the same page.
In several cases we need to print some receipts in 2 copies. Normally these reports are small, using only half the page. If you have this situation, now you can set just one property, and FoxyPreviewer will repeat the current report in the same page, starting from the half vertical part of the page.

Currently works only when you run the report in the preview.
In the preview window, the report will look as original. The 2nd copy will be printed in the same page only when you click the "Print" button in the toolbar or Context menu.

Make your tests, running any of your reports.

Works only in Simplified mode !

DO FOXYPREVIEWER.APP
_Screen.oFoxyPreviewer.lRepeatInPage = .T.
REPORT FORM YourReport PREVIEW

Apart from this, some other minor fixes:

  • Fix in 'lExpandFields' property, now allowing exporting the "*" values correctly in PDF, XLS, RTF and HTML

  • Fix in the Preview form release, sometimes was raising file not found error on closing.

2011-12-07

FoxyPreviewer major update

Info for FoxyPreviewer v2.88.
It brings some minor fixes, but this time a major, jumbo change:

That brings some benefits, like:
- no more need to distribute reportpreview.app and reportoutput.app
- easy debugging, because all the needed files are in the same module (with debuginfo)
- no more need to deal with nonupdated systems. lots of users reported issues, but the source was the report*.app wrong (old) files
- ensure the foxypreviewer initialization will be done using the correct procedures
- a significant increase of speed running the reports and previews

This change meant only 200kb in the app, because most of the needed files were already in foxypreviewer.app and will solve the issue that lots of people had, with wrong report*.app files in their clients.
After this becomes stable, and tested by a considerable quantity of users, i'll publish a separate version of the app, without the debuginfo, to make it 50% smaller.

If for any reason someone wants to keep using the reportpreview.app and reportoutput.app files to render other reports, there should be no problems.
If you use the reportbuilder.app or use report listeners for other purposes, than you should not remore the app files.

I know this change may bring some problems, so please, i'm asking to you to test it in your environments, and specially with your exes. hopefully this will bring many benefits to us. please let me know how that goes. if you find some issues, please provide as much details that you can, so that i can reproduce the issue and upload a fix.

You can get the latest versions directly from here:
http://www.foxypreviewer.com

2011-11-29

FoxyPreviewer for non Latin Languages (v2.87)

Folks,

This is specially for people who work FoxyPreviewer and with a different codepage from 1252 (Latin).
Just uploaded a new version, v2.87 with a fix for some fonts that were appearing strange, condensed, just like below.
Thanks to Ivo Indra and Max Arlikh (tests and screenshots) for their tests, now I know that this solved for Russian and Czech languages. Hopefully this fix will be applicable to other languages.

So, if you're from a non latin country, please update to the latest version, at least 2.87, and let me know how that goes.

The wrong output appears first, then the fixed and correct:


Foxypreviewer general info
Foxypreviewer documentation
FoxyPreviewer FAQS
Foxypreviewer downloads

2011-04-19

The simplest way to create your PDF's / FoxyPreviewer Latest changes

It's been a long time since my last blog post about foxypreviewer. although somehow quiet in the blog, the work behind the scenes has been hard, and I've just released version 2.38, with several fixes and enhancements.

One of the coolest is the following:
to export a report to PDF without previewing, people just need to do the following:
     DO FoxyPreviewer.app
     REPORT FORM YourReport OBJECT TYPE 10


Yes !
That's all you need.
Even better than that, the new - oops !!!!, hahahaha, VFP9 is quite old right now, reporting system from VFP9 allows me to access some of the report clauses used in the report form command. so now we can use the object type clause of the report form command much better, using the "to file" and the "preview", see:

     DO FoxyPreviewer.app
     REPORT FORM (_Samples + "\Solution\Reports\Wrapping.frx") ;       
          OBJECT TYPE 10 ; && regular PDF
          TO FILE ("c:\FoxyNewTest.PDF") ; && destination file        
          PREVIEW    && open the default PDF viewer


to file - is the destination file, that can be sent directly in the report form command !
preview - opens the default file viewer, eg. adobe reader for PDFs

So, in summary, I've enabled 2 object type's allowing automatic PDF generation, without previewing, with just one single line of code, just the same way we used to run our reports!
  • object type # 10 = regular PDF, searchable
  • object type # 11 = PDF as image, non searchable
  • object type # 12 = RTF
  • object type # 13 = XLS
  • object type # 14 = HTML using XSL
  • object type # 15 = HTML using basic HTML commands, easier to export to web
  • object type # 20 = Any file type from the above, just send the corrret file extension, and FoxyPreviewer will internally use the needed ReportListener to create the output
New horizons
A very cool part of all this is that now we have even a new option for report previsualization, trasforming our reports in pdf, and using Adobe Reader to preview them !
that's really neat! Because the reader brings some very nice options for printing, text searching, hyperlinks, emailing, saving, etc etc etc...
If you want to customize your PDFs using the new object type clause, of course you can! Just use the following properties available in the _Screen.oFoxyPreviewer object:
WITH_Screen.oFoxyPreviewer
    .lQuietMode
    .lPdfEmbedFonts
    .lPdfCanPrint
    .lPdfCanEdit
    .lPdfCanCopy
    .lPdfCanAddNotes
    .lPdfEncryptDocument
    .cPdfMasterPassword
    .cPdfUserPassword
    .lPdfShowErrors
    .cPdfSymbolFontsList
    .cPdfAuthor
    .cPdfTitle
    .cPdfSubject
    .cPdfKeywords
    .cPdfCreator
    .cPdfDefaultFont
    .lOpenViewer
    .nPpdfPageMode


These properties are all described in the foxypreviewer documentation.
Of course this needs some tests, i'm waiting for the feedback of people interested in that feature.

The recommended mode - make it simple !!!

From now on, I'm recommending people to use only the simplified mode:
     DO FoxyPreviewer.app
     REPORT FORM YourReport PREVIEW

Some of the main improvements / fixes

- improved the fonts substitution in the PDF rendering. the fonts Arial and Courier New will appear well, using some internal fonts from the pdf engine.
- wingdings was enabled too!
- fix in PDF "stretch to fit" and multilines sentences - thanks to Fabio Vieira
- fix sending emails, automatic opening tables
- from now on, whatever that the pdf engine will not be able to draw, it will get an image from the source report surface, crop and paste the image in the PDF document. This works nice for barcodes, and some fonts that can't be embedded.
- included all of the available properties for the complete mode to the "_screen.ofoxypreviewer" object (that is created after you "do foxypreviewer.app"
- several small fixes in the xls rendering, hopefully now all reports will generate valid worksheets. (special thanks to jorge chang for his samples and testing)
- using the simplified mode now you can change your printer directly from the combobox, thanks to lisa slater nicholls, for her great article "a print job to call your own"


Special thanks

- to all the translators who have been translating the localizations table, alowing the tool to be multilanguage. currently we have 16 languages available!
- Soykan Ozcelik and Luis Maria Guayan, for their terrific support, tests and help, and more than that, for translating the Foxypreviewer documentation to Turkish and Spanish, allowing more people to use the tool, and for providing a very positive and constant support in their local VFP forums. currently we have all dialogs, tooltips and captions available in:

  • english
  • portuguese
  • czech
  • spanish
  • dutch
  • turkish
  • french
  • german
  • indonesian
  • arabic
  • greek
  • italian
  • persian
  • polish
  • russian
  • swahili
- and thanks to all people who have been testing this product very deeply.

That's super important, because this utility is getting really big, with lots of possibilities of usage, and for me it's impossible to test in all environments.


Documentation

As said above, the documentation has been updated, and also translated to turkish and spanish:
English documentation
Turkish documentation / Türkçe dökümantasyon
Spanish documentation / Documentacion en español


The foxypreviewer.app file size

- notice that the file foxypreviewer.app has become bigger, about 3MB. that is because I added the "debug info" information to the app.

That makes the file bigger, but on the other hand, provides a more detailed debugging information. that way, people will be able to tell me the line that originated the bug, even running foxypreviewer in production.

That will be only for now, during the tests. in the future, after i stop making constant changes, I'll remove that, and the apps will come back to the original and compact size, about 1.5 MB

And of course, you can recompile the app using the sources, removing the debuginfo if you want!

Foxypreviewer general info
Foxypreviewer documentation
FoxyPreviewer FAQS
Foxypreviewer downloads

2011-01-21

Using the CTL32 ProgressBar from FoxyPreviewer

Foxypreviewer.app is a collection of classes. Inside the APP there are several classes, that you can access directly using VFP.
Recently I received a request to show how the ctl32 progressbar could be used directly.

Thats's really simple ! The key command is NEWOBJECT(), that allows us to access classes from an external EXE or APP.
First of all the author of this gem, the CTL32 progressbar is Carlos Alloatti. For the complete information on how to use it, please go directly to the CTL32 website: www.ctl32.com.ar

Usage:


=DOTHERM(90, "Caption", "TitleBar") && shows the regular progressbar with 90%


=DOTHERM(-1, "Caption", "TitleBar") && the -1 value in the 1st parameter brings the marquee cool effect


=DOTHERM() && turns off the progressbar


* doTherm.prg
* =doTherm(90, "texto Label", "titulo")
* =doTherm(-1, "teste2", "titulo") && continuo
* =doTherm() && desliga

lparameters tnpercent, tcLabeltext, tctitletext

if not pemstatus(_screen, "oThermForm", 5)
   _screen.addproperty("oThermForm", "")
endif

IF EMPTY(tnPercent)
   TRY
      _SCREEN.oThermForm.RELEASE()
      CATCH
   ENDTRY
   _SCREEN.oThermForm = NULL
   RETURN
ENDIF


IF TYPE("_Screen.oThermForm.Therm") <> "o"   
   DO CreateTherm
ENDIF

LOCAL loThermForm AS Form
loThermForm = _SCREEN.oThermForm
IF NOT EMPTY(tcLabelText)
   loThermForm.ThermLabel.CAPTION = tcLabelText
ENDIF 

IF NOT EMPTY(tcTitleText)
   loThermForm.CAPTION = tcTitleText
ENDIF 
 
IF tnPercent = -1
   loThermForm.Therm.Marquee = .T.
ELSE
   IF loThermForm.Therm.Marquee = .T.
      loThermForm.Therm.Marquee = .F.
   ENDIF
   loThermForm.Therm.VALUE = tnPercent
ENDIF 
loThermForm.VISIBLE = .T.
RETURN


PROCEDURE CreateTherm
LOCAL loForm AS Form
loForm = CREATEOBJECT("Form")
_SCREEN.oThermForm = loForm
LOCAL lnBorder, liThermHeight, liThermWidth, liThermtop, liThermLeft
lnBorder = 7
WITH loForm AS FORM
   .SCALEMODE = 3 && pixels
   .Height = 48
   .HALFHEIGHTCAPTION = .T.
   .WIDTH = 300
   .AUTOCENTER = .T.
   .BORDERSTYLE = 3 && Fixed dialog
   .ControlBox = .F.
   .CLOSABLE = .F.
   .MAXBUTTON = .F.
   .MINBUTTON = .F.
   .MOVABLE = .F.
   .ALWAYSONTOP = .T.
   .ALLOWOUTPUT = .F.

   .NEWOBJECT("Therm","ctl32_ProgressBar", "pr_ctl32_ProgressBar.vcx", LOCFILE("FoxyFreviewer.app"))
   .NEWOBJECT("ThermLabel", "Label")

   .ThermLabel.VISIBLE = .T.
   .ThermLabel.FONTBOLD = .T.
   .ThermLabel.TOP = 4
   .ThermLabel.WIDTH = .WIDTH - (lnBorder * 2)
   .ThermLabel.ALIGNMENT = 2 && center
   liThermHeight = .Height - (lnBorder * 2) - .ThermLabel.Height
   liThermWidth = .Width - (lnBorder * 2)
   .VISIBLE = .T.
ENDWITH
liThermTop = lnBorder + 20
liThermLeft = lnBorder

WITH loForm.Therm
   .TOP = liThermTop
   .LEFT = liThermLeft
   .HEIGHT = liThermHeight
   .WIDTH = liThermWidth
   .MarqueeSpeed = 30
   .MarqueeAnimationSpeed = 30
   .VISIBLE = .T.
   .CAPTION = ""
ENDWITH
ENDPROC


2010-11-22

FoxyPreviewer v2.00 - New email form

The FoxyPreviewer email form uses a custom HTML editor created by Frederic Steczicky from atoutfox.org, and allows you to:

  • generate html outputs for the body of your message
  • changing the formatting, alignments, fonts, adding pictures, hyperlinks, etc...
  • preloading an html
  • attaching more files is allowed
  • mark message as priority
  • ask for read receipt


another cool thing is that after you click on "send", a continuous progress bar, with the cool marquee effect (thanks to Carlos Alloatti) will appear, till the message is delivered:


the old email form, that could generate only plain text messages is still there, you may select it in the settings form:


Obviously, some new messages need to be translated. if you want it to be enabled for your native language, download the most recent version of foxypreviewer, and send me your version of the file foxypreviewer_locs.dbf


Foxypreviewer general info
Foxypreviewer documentation
FoxyPreviewer FAQS
Foxypreviewer downloads

2010-09-29

FoxyPreviewer features - SETTINGS DIALOG

The FoxyPreviewer settings dialog


An additional button in the print preview toolbar and in the context menu (via right clicking at the report preview canvas) calls the "settings definitions" dialog, that allows users to configure interactively 90% of the features of Foxypreviewer.

That means, that every user can determine lots of things related to his report preview definitions.

Users may choose very easilly how the toolbar will appear in the next section, what buttons will be visible, the buttons size, what output types will be available. From the toolbar or the context menu, click at this button, to open the dialog.


This dialog contains a pageframe with 7 different pages, as described below:


1 - General page


  • language - the combobox lets you change all your report dialogs, tooltips, and captions between 22 languages available: English, Portuguese, Spanish, French, German, Greek, Turkish, Italian, Polish, Indonesian, Czech, Persian, Swahili, Hebrew, Arabic, Indonesian, Russian, Dutch, Chinese, Bulgarian, Hungarian, Serbian, among others. At the source folder of Foxypreviewer you'll find the FOXYPREVIEWER_LOCS.DBF table. Please update it from times to times, because every time that a new feature is added, some new strings are included there. Of course, this permits to you to customize some of the texts showns in the dialogs.
  • toolbar visibility - here you define if in the next report preview session the toolbar will be visible, invisible, or if it will follow the resource file settings
  • dock position - determines how the toolbar will appear in the next session, undocked or docked. the combo allows you define the dock position as well.
  • canvas count - determines how many pages will be shown in the preview. choose between 1, 2 or 4 pages at the same time
  • zoom level - determines the zoom level that will be used in the next session
  • window state - choose between, normal, minimized or maximized report preview window
  • progressbar


    • quiet mode - determines if the progressbar will appear during the report generation and during the output generation. if you include the "nodialog" clause in your report, this setting will be ignored
    • progressbar type - choose between the default progressbar (not beautiful at all) or the coolest windows compatible progressbar, compatible with all windows versions, a courtesy of Carlos Alloatti and Dorin Vasilescu. Picture below:
  • version - at the bottom-left part of the dialog form you can see easilly some details of the current version used. Please report this version information if you suspect a bug, or need some assistance

2 - Controls page


  • size of buttons - Determines the size of the buttons to be used - 16x16 or 32x32. Internally, foxypreviewer stores 2 button size options. Users may choose between these options. If you want to use your own buttons, go to the image folder, and replace with your own buttons. Make sure to use the same file names. after recompiling, your FoxyPreviewer.app version will show your pictures. Below you can see the toolbar in the big size (32x32)
  • printing preferences button - determines the visibility of the "Printing Preferences" button in the toolbar and context menu


    • preferences options: "Global printer prompt options" - shows the VFP9 default printer prompt dialog. This is the deprecated, but still flexible dialog; it allows your users to determine the printer for the output, change preferences, access an uninstalled printer from the LAN, etc. The disadvantage is that if the user clicks on the "cancel" button, the report preview will be closed.
    • preferences options: "Setup Property Sheet for the current printer" - shows the preferences dialog for the current printer. This will not allow you to switch to another printer, but if the user clicks on "Cancel", the preview will be restored.
    • preferences options: "Enhanced Printing Preferences dialog" - shows the new and enhanced Printing Preferences dialog of FoxyPreviewer v3.0. This brings a new and super flexible printing dialog form, bringing options available in the actual printing preview dialogs from other platforms.


  • copies - determines if the copies spinner will be shown in the toolbar. This control will allow your users to change the quantity of copies for the current report session.
  • save report - determines if the "save" button will be available in the toolbar and context menu. See in the next section how to determine which output file options you can make available.
  • available printers - determines if a combobox with all the available printers will be visible. This control will allow users to switch the printer output during the preview.
  • send report by e-mail - determines if the e-mail button will be visible. See in the 4th page information ( in the "e-mail" tab ) more instructions of usage
  • miniatures - determines if the miniatures preview form button will be visible in the preview toolbar and context menu
  • miniatures per page - determines the maximum quantity of miniatures that will be shown per page when you choose miniatures preview mode
  • find - determines if the search button will be available in the preview toolbar and context menu

    • max pages to search - determines the quantity of pages that the search engine will store information. When you have a really big report, of more than 200 pages, users will notice a very important performance difference, because during the report generation it will be saving information of all the fields from the report. Set the numeric value of "-1" to tell Foxypreviewer to perform the searches in all pages


3 - Output page


Here you can define what output options you'll have available in the "save report" menu, like in the picture below:


  • save as image file - determines if the save to image option will be available in the output options menu
  • save as PDF
  • save as HTML, MHTML
  • save as RTF
  • save as XLS
  • save as TXT / CSV / XL5
  • output path - determine the path / directory where the output files will be saved


4 - E-mail page


In this page you have several emailing options. Choose the one that you find the most appropriate for your case, OS, etc.


  • email mode - choose between MAPI, CDO, or your custom procedure.

    • MAPI - will fire your default MAPI compatible app, like Outlook Express, Office Outlook, Windows Live Mail, showing your report as an attachment. All you have to do is click on the "send" button. this does not always work. Please advice your users to make some tests before using this option.

    • CDO - uses the CDO2000 component included in windows 2000 and later. It allows you to send emails using an SMTP server. All settings must be accurate in order to make this work. For example, below is the configuration for a Hotmail or Live account to send emails. You may check also at Sergey Berezniker's blog for more information on how to send using MSN, Yahoo or Gmail email messages using CDO: http://www.berezniker.com/category/topic/email
    • custom procedure - You can use your own procedure to send the current report. Use Foxypreviewer property "cEmailPrg", and fill it with the name of the prg responsible for sending emails. This PRG receives as a parameter the file name of the file created that you will send as attachment. Have a look at the samples provided, the file MYSENDMAIL.PRG shows how you would need to make your custom procedure.
  • Attachment Type: determines the file type that will be used to convert the report to be sent by e-mail. Default is PDF, among XLS, RTF, HTML, TIF or PDF.
  • Automatically generate e-mail file: when not checked, FoxyPreviewer will ask the user first for the attachment type
  • CDO e-mail settings: Users can add their own settings for sending their e-mails. The 'HTML' textbox lets you store a simple HTML file, that will contain some texts to be inserted in your e-mails, such as a signature.


Foxypreviewer general info
Foxypreviewer documentation
FoxyPreviewer FAQS
Foxypreviewer downloads