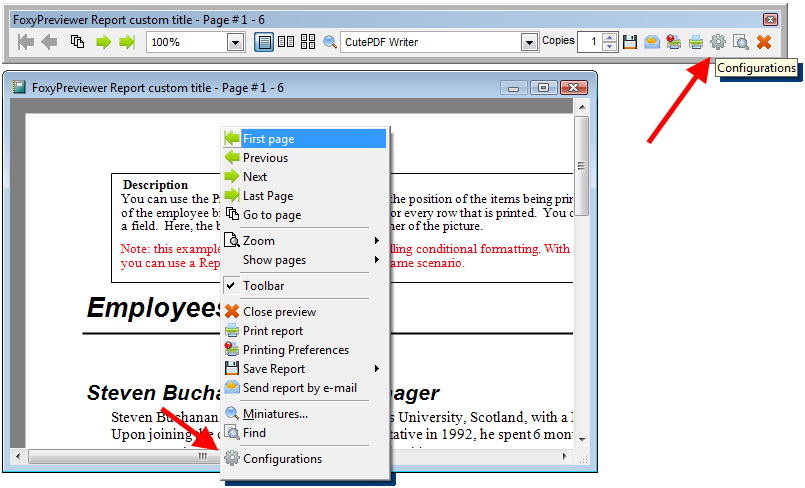
An additional button in the print preview toolbar and in the context menu (via right clicking at the report preview canvas) calls the "settings definitions" dialog, that allows users to configure interactively 90% of the features of Foxypreviewer.
That means, that every user can determine lots of things related to his report preview definitions.
Users may choose very easilly how the toolbar will appear in the next section, what buttons will be visible, the buttons size, what output types will be available. From the toolbar or the context menu, click at this button, to open the dialog.
This dialog contains a pageframe with 7 different pages, as described below:
1 - General page

- language - the combobox lets you change all your report dialogs, tooltips, and captions between 22 languages available: English, Portuguese, Spanish, French, German, Greek, Turkish, Italian, Polish, Indonesian, Czech, Persian, Swahili, Hebrew, Arabic, Indonesian, Russian, Dutch, Chinese, Bulgarian, Hungarian, Serbian, among others. At the source folder of Foxypreviewer you'll find the FOXYPREVIEWER_LOCS.DBF table. Please update it from times to times, because every time that a new feature is added, some new strings are included there. Of course, this permits to you to customize some of the texts showns in the dialogs.
- toolbar visibility - here you define if in the next report preview session the toolbar will be visible, invisible, or if it will follow the resource file settings
- dock position - determines how the toolbar will appear in the next session, undocked or docked. the combo allows you define the dock position as well.
- canvas count - determines how many pages will be shown in the preview. choose between 1, 2 or 4 pages at the same time
- zoom level - determines the zoom level that will be used in the next session
- window state - choose between, normal, minimized or maximized report preview window
- progressbar
- quiet mode - determines if the progressbar will appear during the report generation and during the output generation. if you include the "nodialog" clause in your report, this setting will be ignored
- progressbar type - choose between the default progressbar (not beautiful at all) or the coolest windows compatible progressbar, compatible with all windows versions, a courtesy of Carlos Alloatti and Dorin Vasilescu. Picture below:

- version - at the bottom-left part of the dialog form you can see easilly some details of the current version used. Please report this version information if you suspect a bug, or need some assistance
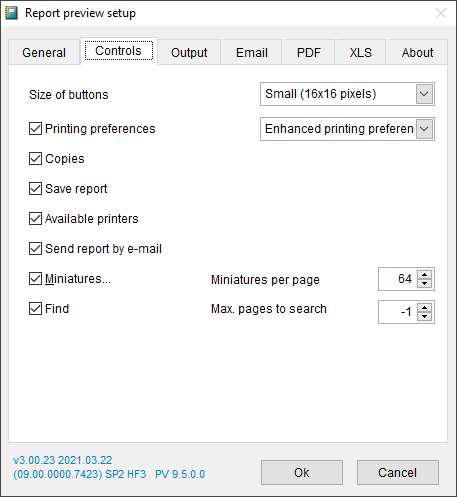
2 - Controls page
- size of buttons - Determines the size of the buttons to be used - 16x16 or 32x32. Internally, foxypreviewer stores 2 button size options. Users may choose between these options. If you want to use your own buttons, go to the image folder, and replace with your own buttons. Make sure to use the same file names. after recompiling, your FoxyPreviewer.app version will show your pictures. Below you can see the toolbar in the big size (32x32)

- printing preferences button - determines the visibility of the "Printing Preferences" button in the toolbar and context menu
- preferences options: "Global printer prompt options" - shows the VFP9 default printer prompt dialog. This is the deprecated, but still flexible dialog; it allows your users to determine the printer for the output, change preferences, access an uninstalled printer from the LAN, etc. The disadvantage is that if the user clicks on the "cancel" button, the report preview will be closed.
- preferences options: "Setup Property Sheet for the current printer" - shows the preferences dialog for the current printer. This will not allow you to switch to another printer, but if the user clicks on "Cancel", the preview will be restored.
- preferences options: "Enhanced Printing Preferences dialog" - shows the new and enhanced Printing Preferences dialog of FoxyPreviewer v3.0. This brings a new and super flexible printing dialog form, bringing options available in the actual printing preview dialogs from other platforms.


- copies - determines if the copies spinner will be shown in the toolbar. This control will allow your users to change the quantity of copies for the current report session.
- save report - determines if the "save" button will be available in the toolbar and context menu. See in the next section how to determine which output file options you can make available.
- available printers - determines if a combobox with all the available printers will be visible. This control will allow users to switch the printer output during the preview.
- send report by e-mail - determines if the e-mail button will be visible. See in the 4th page information ( in the "e-mail" tab ) more instructions of usage
- miniatures - determines if the miniatures preview form button will be visible in the preview toolbar and context menu
- miniatures per page - determines the maximum quantity of miniatures that will be shown per page when you choose miniatures preview mode
- find - determines if the search button will be available in the preview toolbar and context menu
- max pages to search - determines the quantity of pages that the search engine will store information. When you have a really big report, of more than 200 pages, users will notice a very important performance difference, because during the report generation it will be saving information of all the fields from the report. Set the numeric value of "-1" to tell Foxypreviewer to perform the searches in all pages
3 - Output page
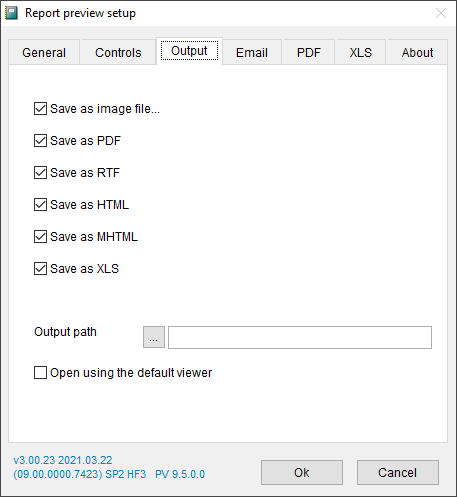
Here you can define what output options you'll have available in the "save report" menu, like in the picture below:
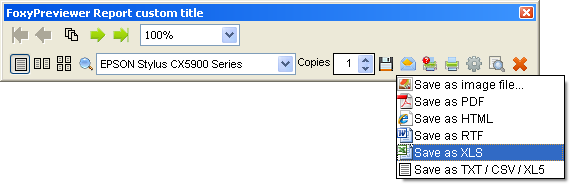
- save as image file - determines if the save to image option will be available in the output options menu
- save as PDF
- save as HTML, MHTML
- save as RTF
- save as XLS
- save as TXT / CSV / XL5
- output path - determine the path / directory where the output files will be saved
4 - E-mail page
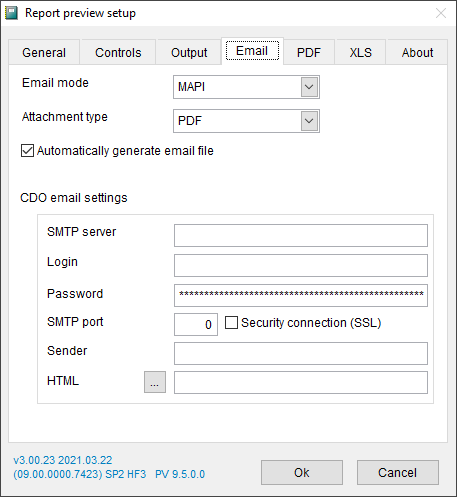
In this page you have several emailing options. Choose the one that you find the most appropriate for your case, OS, etc.
- email mode - choose between MAPI, CDO, or your custom procedure.
- MAPI - will fire your default MAPI compatible app, like Outlook Express, Office Outlook, Windows Live Mail, showing your report as an attachment. All you have to do is click on the "send" button. this does not always work. Please advice your users to make some tests before using this option.
- CDO - uses the CDO2000 component included in windows 2000 and later. It allows you to send emails using an SMTP server. All settings must be accurate in order to make this work. For example, below is the configuration for a Hotmail or Live account to send emails. You may check also at Sergey Berezniker's blog for more information on how to send using MSN, Yahoo or Gmail email messages using CDO: http://www.berezniker.com/category/topic/email

- custom procedure - You can use your own procedure to send the current report. Use Foxypreviewer property "cEmailPrg", and fill it with the name of the prg responsible for sending emails. This PRG receives as a parameter the file name of the file created that you will send as attachment. Have a look at the samples provided, the file MYSENDMAIL.PRG shows how you would need to make your custom procedure.
- Attachment Type: determines the file type that will be used to convert the report to be sent by e-mail. Default is PDF, among XLS, RTF, HTML, TIF or PDF.
- Automatically generate e-mail file: when not checked, FoxyPreviewer will ask the user first for the attachment type
- CDO e-mail settings: Users can add their own settings for sending their e-mails. The 'HTML' textbox lets you store a simple HTML file, that will contain some texts to be inserted in your e-mails, such as a signature.
Foxypreviewer general info
Foxypreviewer documentation
FoxyPreviewer FAQS
Foxypreviewer downloads