2012-03-16

Draw rotated strings with GdiPlusX

Gdi+ provides many ways to draw rotated objects, like images, strings and shapes. Basically, we need to do a translate transformation to the location of the text, then a rotate transform through the required angle, and then writing the text as normal using drawstring.


This is the definition found in MSDN: "The rotation operation consists of multiplying the transformation matrix by a matrix whose elements are derived from the angle parameter. This method applies the rotation by prepending it to the transformation matrix."


IMPORTANT:
All samples below use the new GDIPlus-X library, that is still in ALPHA version, but is already stable and reliable to do the majority of GDI+ tasks. Download the latest stable release from GitHub:

* Initialize GdiPlus-X library
DO LOCFILE("System.App")

WITH _SCREEN.SYSTEM.Drawing

* Create a new and empty Bitmap
LOCAL loBmp as xfcBitmap
loBmp = .Bitmap.New(180,180)

* Create a Graphics object associated to the bitmap
LOCAL loGfx as xfcGraphics
loGfx = .Graphics.FromImage(loBmp)

* Clear the BackGround of the image with light blue
loGfx.Clear(.Color.FromRgb(230,230,255))

* Create a SolidBrush with Red Color
LOCAL loBrush AS xfcBrush
loBrush = .SolidBrush.New(.COLOR.FromRgb(255,0,0))
* The above statement could be also :
* loBrush = .SolidBrush.New(.COLOR.FromARgb(255,255,0,0))
* loBrush = .SolidBrush.New(.COLOR.Red)

* Create a Rectangle in which the rotated text will be drawn
LOCAL loRect AS xfcRectangle
loRect = .Rectangle.New(0, 0, loBmp.Width, loBmp.Height)

* Get a basic string format object, then set properties
LOCAL loStringFormat AS xfcStringFormat
loStringFormat = .StringFormat.New()
loStringFormat.ALIGNMENT = .StringAlignment.CENTER
loStringFormat.LineAlignment = .StringAlignment.CENTER

* Create a Font object
LOCAL loFont AS xfcFont
loFont = .FONT.New("Verdana",16, .FontStyle.Bold, .GraphicsUnit.POINT)

* After creating all needed objects, we can apply the rotation
* and draw the text

* Translate and Rotate
loGfx.TranslateTransform(loBmp.Width /2, loBmp.Height /2)
loGfx.RotateTransform(-45) && angle of 45 degrees
loGfx.TranslateTransform(-loBmp.Width /2, -loBmp.Height /2)

* Finally, draw the string
loGfx.DrawString("Rotated Text" + CHR(13) + CHR(10) + "GDIPlus-X is COOL !!!", ;
loFont, loBrush, loRect, loStringFormat)

* Reset Rotation
loGfx.ResetTransform()

* Save image to File
loBmp.Save("c:\rotated.png", .Imaging.ImageFormat.Png)

ENDWITH

* Show created image
RUN /N explorer.exe c:\rotated.png


TIME TO PLAY
For the above sample I used a cool trick to rotate the text at the center of the image, and not at the left edge, that is the default behavior. Now it's up to you to make some tests. Try omitting the two lines that call the Graphics.TranslateTransform, change the angle, using negative and positive angles, etc...

* Translate and Rotate
loGfx.TranslateTransform(loBmp.Width /2, loBmp.Height /2)
loGfx.RotateTransform(-45) && angle of 45 degrees
loGfx.TranslateTransform(-loBmp.Width /2, -loBmp.Height /2)


In the "Samples" folder of the latest GDIPlus-X library version there's another cool sample, "Rotation.Scx", in which another translation technique was used. All the codes are in the "BeforeDraw" method of the ImageCanvas object.


DRAW ROTATED STRINGS IN YOUR REPORTS !


The real reason for this post was a request from my friend from Foxbrasil Emerson Santon Reed, when he asked about creating a watermark of a big text rotated in 45 degrees in a report.
So, my part was just to adapt the GDI+ code shown above to the ReportListener class and Report that he provided.
Run the code below to see a rotated text centered at 45 degrees in a report:

* Create a sample Report
LOCAL i
CREATE CURSOR dummy (fld1 c(20), fld2 c(15))
FOR i=1 TO 100
  INSERT INTO dummy VALUES ("ReportListener with GdiPlus-X", "Visit CodePlex")
ENDFOR
SELECT dummy
CREATE REPORT _testreport FROM dummy

* Init GdiPlus-X
DO LOCFILE("System.App")

* Load Listener class
LOCAL loreportlistener
loreportlistener = CREATEOBJECT("MyReportListener")
loreportlistener.LISTENERTYPE = 1

* Call the report using our listener
REPORT FORM _testreport OBJECT loreportlistener
USE IN dummy
RETURN


DEFINE CLASS myreportlistener AS _reportlistener OF ;
    ADDBS(HOME()) + "FFC\" + "_ReportListener.VCX"
  newPage = .T.
  oGdigraphics = NULL

  FUNCTION BEFOREREPORT
    DODEFAULT()
    This.ogdigraphics = _SCREEN.SYSTEM.drawing.graphics.new()
  ENDFUNC

  FUNCTION BEFOREBAND(nbandobjcode, nfrxrecno)
  #DEFINE FRX_OBJCOD_PAGEHEADER               1

  IF nbandobjcode==frx_objcod_pageheader
      This.NewPage = .T.
      IF NOT This.issuccessor
        This.sharedgdiplusgraphics = This.GDIPLUSGRAPHICS
      ENDIF
      This.ogdigraphics.handle = This.sharedgdiplusgraphics
  ENDIF
  DODEFAULT(nBandObjCode, nFRXRecNo)
  ENDFUNC

  PROCEDURE RENDER(nfrxrecno,;
     nleft,ntop,nwidth,nheight,;
     nobjectcontinuationtype, ;
     ccontentstoberendered, gdiplusimage)

     WITH _SCREEN.SYSTEM.drawing

     IF This.NewPage
        * Create a SolidBrush with Red Color
        LOCAL lobrush AS xfcbrush
        lobrush = .solidbrush.new(.COLOR.fromRgb(255,64,64))

        * Create a Rectangle in which the rotated text will be drawn
        LOCAL lorect AS xfcrectangle
        lorect = .rectangle.new(0, 0, This.sharedpagewidth,;
          This.sharedpageheight)

        * Get a basic string format object, then set properties
        LOCAL lostringformat AS xfcstringformat
        lostringformat = .stringformat.new()
        lostringformat.ALIGNMENT = .stringalignment.CENTER
        lostringformat.linealignment = .stringalignment.CENTER

        * Create a Font object
        LOCAL lofont AS xfcfont
        lofont = .FONT.new("Verdana",48, 0, .graphicsunit.POINT)

        * Translate and Rotate
        This.ogdigraphics.translatetransform(This.sharedpagewidth/2,;
          This.sharedpageheight/2)
        This.ogdigraphics.rotatetransform(-45)
        This.ogdigraphics.translatetransform(-This.sharedpagewidth/2,;
          -This.sharedpageheight/2)
        This.ogdigraphics.drawstring("Rotated Text" +CHR(13)+CHR(10)+;
          "GDIPlus-X is COOL !!!", ;
          lofont, lobrush, lorect, lostringformat)

        * Reset Rotation
        This.ogdigraphics.resettransform

        This.NewPage = .F.

     ENDIF
     ENDWITH
     DODEFAULT(nfrxrecno,;
        nleft,ntop,nwidth,nheight,;
        nobjectcontinuationtype, ;
        ccontentstoberendered, gdiplusimage)

  ENDPROC
ENDDEFINE


UPDATE 06-08-31
To make sure that the watermark will not be overwritten by opaque controls, the code below does the same thing shown above, but this time draws the watermark only after the footer band is totally rendered. The color used for this case was also changed from opaque to semitransparent, using Alpha of 128 ( 0 = totally transparent, 255 = opaque). So, here's the new ReportListener subclass to deal with this problem:

DEFINE CLASS myreportlistener AS _reportlistener OF ;
    ADDBS(HOME()) + "FFC\" + "_ReportListener.VCX"
  ogdigraphics = NULL

  FUNCTION BEFOREREPORT
    DODEFAULT()
    This.ogdigraphics = _Screen.System.Drawing.Graphics.New()
  ENDFUNC

  FUNCTION AFTERBAND(nbandobjcode, nfrxrecno)
  *-- FRX OBJCODE column values
  #DEFINE FRX_OBJCOD_TITLE                    0
  #DEFINE FRX_OBJCOD_PAGEHEADER               1
  #DEFINE FRX_OBJCOD_COLHEADER                2
  #DEFINE FRX_OBJCOD_GROUPHEADER              3
  #DEFINE FRX_OBJCOD_DETAIL                   4
  #DEFINE FRX_OBJCOD_GROUPFOOTER              5
  #DEFINE FRX_OBJCOD_COLFOOTER                6
  #DEFINE FRX_OBJCOD_PAGEFOOTER               7
  #DEFINE FRX_OBJCOD_SUMMARY                  8
  #DEFINE FRX_OBJCOD_DETAILHEADER             9
  #DEFINE FRX_OBJCOD_DETAILFOOTER            10

  IF nbandobjcode==frx_objcod_pagefooter
      IF NOT This.issuccessor
        This.sharedgdiplusgraphics = This.GDIPLUSGRAPHICS
      ENDIF
      This.ogdigraphics.handle = This.sharedgdiplusgraphics
   
      WITH _SCREEN.SYSTEM.drawing
        * Create a SolidBrush with Red semi transparent color
        LOCAL lobrush AS xfcbrush
        lobrush = .solidbrush.new(.COLOR.fromArgb(128,255,128,128))

        * Create a Rectangle in which the rotated text will be drawn
        LOCAL lorect AS xfcrectangle
        lorect = .rectangle.new(0, 0, This.sharedpagewidth,;
          This.sharedpageheight)

        * Get a basic string format object, then set properties
        LOCAL lostringformat AS xfcstringformat
        lostringformat = .stringformat.new()
        lostringformat.ALIGNMENT = .stringalignment.CENTER
        lostringformat.linealignment = .stringalignment.CENTER

        * Create a Font object
        LOCAL lofont AS xfcfont
        lofont = .FONT.new("Verdana",48, 0, .graphicsunit.POINT)

        * Translate and Rotate
        This.ogdigraphics.translatetransform(This.sharedpagewidth/2,;
          This.sharedpageheight/2)
        This.ogdigraphics.rotatetransform(-45)
        This.ogdigraphics.translatetransform(-This.sharedpagewidth/2,;
          -This.sharedpageheight/2)
        This.ogdigraphics.drawstring("Rotated Text" +CHR(13)+CHR(10)+;
          "GDIPlus-X is COOL !!!", ;
          lofont, lobrush, lorect, lostringformat)

        * Reset Rotation
        This.ogdigraphics.resettransform()

      ENDWITH
    ENDIF
    DODEFAULT(nBandObjCode, nFRXRecNo)
  ENDFUNC
ENDDEFINE


RELATED LINKS
Article from Bill Wagner  http://www.ftponline.com/vsm/2002_10/online/csharp_bwagner_10_31_02/

Captcha image generator with GdiPlusX

Recently I was navigating at Rick Strahl's Blog, when I found a very interesting post, "A Captcha Image generator for FoxPro", in which he shows how he created some captcha images. As Rick said in his post, "CAPTCHA basically displays a verification image next to a textbox that has to be filled out to validate the current request. It’s not a foolproof approach for validation and it has some issues with accessibility but it seems to be a common solution to this problem". The generated image contains a random text.
In that case, Rick chose to create a DLL in C++, and call it from VFP. Here, I'll show how to obtain the same results using the new GdiPlus-X library.
The codes below might be useful for other purposes too, because some interesting drawing techniques were used there.
To obtain the random string, I created a very simple function, that receives as parameter the quantity of characters that will be created:


PROCEDURE CreateString(tnLength)
   LOCAL lcText, lcChar, x, n
   lcText = ""
   FOR n = 1 TO tnLength
      x = INT(RAND() * 36)
      lcChar = IIF(x < 10, TRANSFORM(x), CHR(x + 55))
      lcText = lcText + lcChar
   ENDFOR
   RETURN lcText
ENDPROC


TIME TO PLAY!

IMPORTANT:
All samples below use the new GDIPlus-X library. Download the latest stable release from Codeplex:
http://www.codeplex.com/Wiki/View.aspx?ProjectName=VFPX&title=GDIPlusX


SAMPLE 1 - CREATE A SIMPLE IMAGE AND DRAW SOME TEXT


** Captcha Image Generator
** Creates a very simple image containing a string
** Based on Rick Strahl post on his weblog
** http://www.west-wind.com/wconnect/weblog/ShowEntry.blog?id=556

* The following sample demonstrates how to create a simple Captcha Generator

LOCAL lcText AS Character
lcText = CreateString(8)

DO LOCFILE("System.App")

LOCAL loBmp AS xfcBitmap
LOCAL loFont AS xfcFont
LOCAL loSizeF AS xfcSizeF
LOCAL loScreenGfx AS xfcGraphics
LOCAL loGfx AS xfcGraphics

WITH _SCREEN.System.Drawing
loScreenGfx = .Graphics.FromHwnd(_Screen.HWnd)
loFont = .Font.New("Tahoma",20)  && Font Name, Size

* Obtain the width and height needed for the string
loSizeF = loScreenGfx.MeasureString(lcText, loFont)

* Create the new bitmap
loBmp = .Bitmap.New(loSizeF.Width, loSizeF.Height)
* Obtain a Graphics object to draw
loGfx = .Graphics.FromImage(loBmp)
loGfx.Clear(.Color.White)

* Draw the whole String
loGfx.DrawString(lcText, loFont, .Brushes.Black, 0, 0)

* Save image to disk
loBmp.Save("c:\captcha1.png", .Imaging.ImageFormat.Png)
ENDWITH

* Show image in Explorer
RUN /n explorer.exe c:\captcha1.png
RETURN

PROCEDURE CreateString(tnLength)
   LOCAL lcText, lcChar, x, n
   lcText = ""
   FOR n = 1 TO tnLength
      x = INT(RAND() * 36)
      lcChar = IIF(x < 10, TRANSFORM(x), CHR(x + 55))
      lcText = lcText + lcChar
   ENDFOR
   RETURN lcText
ENDPROC


The above sample creates the most simple image, containing a random string inside. To get the size needed to create the Bitmap, in a first moment I created a Graphics object from the _Screen. This object has only one task: to allow us to call the function MeasureString to obtain the size needed for our bitmap, as you can see below:

loScreenGfx = .Graphics.FromHwnd(_Screen.HWnd)
loFont = .Font.New("Tahoma",20) && FontName, FontSize
* Obtain the width and height needed for the string
loSizeF = loScreenGfx.MeasureString(lcText, loFont)
* Create the new bitmap
loBmp = .Bitmap.New(loSizeF.Width, loSizeF.Height)


SAMPLE 2 - CREATE A SIMPLE IMAGE AND DRAW SOME TEXT ON A HATCH BACKGROUND     


** Captcha Image Generator
** Creates a very simple image containing a string on a hatch background
** Based on Rick Strahl post on his weblog
** http://www.west-wind.com/wconnect/weblog/ShowEntry.blog?id=556

* The following sample demonstrates how to create a simple Captcha Generator

LOCAL lcText AS Character
lcText = CreateString(8)

DO LOCFILE("System.App")

LOCAL loBmp AS xfcBitmap
LOCAL loFont AS xfcFont
LOCAL loSizeF AS xfcSizeF
LOCAL loScreenGfx AS xfcGraphics
LOCAL loGfx AS xfcGraphics

WITH _SCREEN.System.Drawing
loScreenGfx = .Graphics.FromHwnd(_Screen.HWnd)
loFont = .Font.New("Tahoma",20)  && Font Name, Size

* Obtain the width and height needed for the string
loSizeF = loScreenGfx.MeasureString(lcText, loFont)


* Create the new bitmap
loBmp = .Bitmap.New(loSizeF.Width, loSizeF.Height)
* Obtain a Graphics object to draw
loGfx = .Graphics.FromImage(loBmp)
loGfx.Clear(.Color.White)

liRand = INT(RAND()*52) + 1


* Fill the background of the rectangle with a random Hatch Brush
loGfx.FillRectangle( ;
   .Drawing2D.HatchBrush.New(liRand, .Color.Black, .Color.White),;
   0,0,loBmp.Width,loBmp.Height)
* Draw the whole string
loGfx.DrawString(lcText, loFont, .Brushes.Black, 0, 0)

* Save image to disk
loBmp.Save("c:\captcha2.png", .Imaging.ImageFormat.Png)
ENDWITH

* Show image in Explorer
RUN /n explorer.exe c:\captcha2.png
RETURN

PROCEDURE CreateString(tnLength)
   LOCAL lcText, lcChar, x, n
   lcText = ""
   FOR n = 1 TO tnLength
      x = INT(RAND() * 36)
      lcChar = IIF(x < 10, TRANSFORM(x), CHR(x + 55))
      lcText = lcText + lcChar
   ENDFOR
   RETURN lcText
ENDPROC
               

This is exactly the same sample we used before, but adding a hatch background. Gdi+ provides 52 different preset patterns for hatch brushes. In this sample, I chose to use a random one. Test it, and choose the one that you like most:


* Fill the background of the rectangle with a random Hatch Brush
loGfx.FillRectangle( ;
   .Drawing2D.HatchBrush.New(liRand, .Color.Black, .Color.White),;
   0,0,loBmp.Width,loBmp.Height)


SAMPLE 3 - DRAW SOME TEXT ON A COLORED BACKGROUND USING RANDOM COLORS      


** Captcha Image Generator
** Creates a simple image containing a string
** Each character in a different random color
** in a random background color
** Based on Rick Strahl post on his weblog
** http://www.west-wind.com/wconnect/weblog/ShowEntry.blog?id=556

* The following sample demonstrates how to create a simple Captcha Generator


LOCAL lcText AS Character
lcText = CreateString(8)

DO LOCFILE("System.App")

LOCAL loBmp AS xfcBitmap
LOCAL loFont AS xfcFont
LOCAL loSizeF AS xfcSizeF
LOCAL loScreenGfx AS xfcGraphics
LOCAL loGfx AS xfcGraphics

WITH _SCREEN.System.Drawing
loScreenGfx = .Graphics.FromHwnd(_Screen.HWnd)
loFont = .Font.New("Tahoma",20)  && Font Name, Size

* Obtain the width and height needed for the string
loSizeF = loScreenGfx.MeasureString(lcText, loFont)


* Obtain the width and height needed for the string
loSizeF = loScreenGfx.MeasureString(lcText, loFont)

LOCAL lnWidth, lnHeight, lnCharWidth
lnWidth = loSizeF.Width * 1.5 && Stretch 50% to ensure rotated
&& characters will fit
lnHeight = loSizeF.Height
lnCharWidth = lnWidth / LEN(lcText)


* Create the new bitmap
loBmp = .Bitmap.New(lnWidth, lnHeight)
* Obtain a Graphics object to draw
loGfx = .Graphics.FromImage(loBmp)
loGfx.Clear(.Color.White)


* Fill the background of the rectangle with a random Solid Brush color
* We need here a pastel color, so let's make each channel will be
* at least 180

* Draw the background rectangle
loGfx.FillRectangle( ;
   .SolidBrush.New(.Color.FromARGB(255, INT(RAND() * 76)+180, ;
   INT(RAND() * 76)+180, INT(RAND() * 76)+180)), ;
   0,0,loBmp.Width,loBmp.Height)
* Draw each character in a different random color
LOCAL n, lcChar
LOCAL loBrush AS xfcSolidBrush

FOR n = 0 TO LEN(lcText)
   lcChar = SUBSTR(lcText, n, 1)

   * Create a brush with a random color
   loBrush = .SolidBrush.New(.Color.FromRGB(INT(RAND() * 0xFFFFFF)))

   * Draw the character
   loGfx.DrawString(lcChar, loFont, loBrush, (n-1) * lnCharWidth, 0)
ENDFOR


* Save image to disk
loBmp.Save("c:\captcha3.png", .Imaging.ImageFormat.Png)
ENDWITH

* Show image in Explorer
RUN /n explorer.exe c:\captcha3.png
RETURN

PROCEDURE CreateString(tnLength)
   LOCAL lcText, lcChar, x, n
   lcText = ""
   FOR n = 1 TO tnLength
      x = INT(RAND() * 36)
      lcChar = IIF(x < 10, TRANSFORM(x), CHR(x + 55))
      lcText = lcText + lcChar
   ENDFOR
   RETURN lcText
ENDPROC

This time I chose to create the background using a Solid Brush with a random backColor. For that I wanted to ensure to obtain a pastel color, so I used
INT(RAND() * 76) + 180  for each RGB color channel. This way, each channel will have at least the value 180, ensuring to obtain a bright color.
To draw each color in a different random color was easy too. Just looped through the string and drawn each character in its proportional position. This time, I wanted to have ANY random color, so that could be any value between 0 (RGB[0,0,0] - black) and 0xFFFFFF (RGB[255,255,255] - white).


* Create a brush with a random color
loBrush = .SolidBrush.New(.Color.FromRGB(INT(RAND() * 0xFFFFFF)))


SAMPLE 4 - DRAW SOME TEXT ON A COLORED HATCH BACKGROUND USING RANDOM COLORS WITH CHARACTER ROTATION


** Captcha Image Generator
** Creates an image containing a string
** Each character in a different random color and a slight rotation
** Based on Rick Strahl post on his weblog
** http://www.west-wind.com/wconnect/weblog/ShowEntry.blog?id=556

* The following sample demonstrates how to create a simple Captcha Generator


LOCAL lcText AS Character
lcText = CreateString(8)

DO LOCFILE("System.App")

LOCAL loBmp AS xfcBitmap
LOCAL loFont AS xfcFont
LOCAL loSizeF AS xfcSizeF
LOCAL loScreenGfx AS xfcGraphics
LOCAL loGfx AS xfcGraphics

WITH _SCREEN.System.Drawing
loScreenGfx = .Graphics.FromHwnd(_Screen.HWnd)
loFont = .Font.New("Tahoma",20)  && Font Name, Size

* Obtain the width and height needed for the string
loSizeF = loScreenGfx.MeasureString(lcText, loFont)


LOCAL lnWidth, lnHeight, lnCharWidth
lnWidth = loSizeF.Width * 1.5 && Stretch 50% to ensure rotated
&& characters will fit
lnHeight = loSizeF.Height
lnCharWidth = lnWidth / LEN(lcText)


* Create the new bitmap
loBmp = .Bitmap.New(lnWidth, lnHeight)
* Obtain a Graphics object to draw
loGfx = .Graphics.FromImage(loBmp)
loGfx.Clear(.Color.White)

* Fill the background rectangle using a Hatch Brush with random pastel colors
loGfx.FillRectangle( ;
.Drawing2D.HatchBrush.New(INT(RAND()*52), ;
.Color.FromARGB(255, INT(RAND() * 76)+180, INT(RAND() * 76)+180, INT(RAND() * 76)+180), ;
0,0,loBmp.Width,loBmp.Height)

* Draw each character in a different random color
* and a random rotation angle from -40 to +40 degrees
LOCAL n, lcChar
LOCAL loBrush AS xfcSolidBrush
LOCAL loMatrix AS xfcMatrix

FOR n = 0 TO LEN(lcText)
   lcChar = SUBSTR(lcText, n, 1)

   * Create a brush with a random color
   loBrush = .SolidBrush.New(.Color.FromRGB(INT(RAND() * 0xFFFFFF)))

   * Create a Matrix to apply rotation to the characters
   loMatrix = _Screen.System.Drawing.Drawing2D.Matrix.New()

   * Calculate random angle
   lnAngle = INT(RAND() * 80) - 40
   * Rotate at the center of each character position
   loMatrix.RotateAt(lnAngle, ;
      .Point.New((n-1) * lnCharWidth + (lnCharWidth / 2), lnHeight / 2))

   * Associate the Matrix to the Graphics object
   loGfx.Transform = loMatrix

   * Draw the character
   loGfx.DrawString(lcChar, loFont, loBrush, (n-1) * lnCharWidth, 0)
ENDFOR

* Save image to disk
loBmp.Save("c:\captcha4.png", .Imaging.ImageFormat.Png)
ENDWITH

* Show image in Explorer
RUN /n explorer.exe c:\captcha4.png
RETURN

PROCEDURE CreateString(tnLength)
   LOCAL lcText, lcChar, x, n
   lcText = ""
   FOR n = 1 TO tnLength
      x = INT(RAND() * 36)
      lcChar = IIF(x < 10, TRANSFORM(x), CHR(x + 55))
      lcText = lcText + lcChar
   ENDFOR
   RETURN lcText
ENDPROC

This time we did the same, but using a random Hatch Brush for the background, and aplying a slight rotation on each character. String rotation was already discussed in a previous post, anyway, here's a short explanation:
"System.Drawing" brings a method that permits to draw any object (shape, text, another image) using rotation, at any angle. For that we need to create a Matrix object, and use the "RotateAt" method, passing the center point of the object to be rotated. In this case, I needed to pass the center of the string.

* Create a Matrix to apply rotation to the characters
loMatrix = .Drawing2D.Matrix.New()

* Calculate random angle
lnAngle = INT(RAND() * 80) - 40
* Rotate at the center of each character position
loMatrix.RotateAt(lnAngle, ;
   .Point.New((n-1) * lnCharWidth + (lnCharWidth / 2), lnHeight / 2))

* Associate the Matrix to the Graphics object
loGfx.Transform = loMatrix

* Draw the character
loGfx.DrawString(lcChar, loFont, loBrush, (n-1) * lnCharWidth, 0)


WHAT MORE?


We can do some more things, like to draw some random lines on the image. One way could be just adding this simple code immediately before saving the image:


LOCAL x1, y1, x2, y2, lnColor
FOR n = 1 TO 10
   x1 = RAND() * lnWidth
   x2 = RAND() * lnWidth
   y1 = RAND() * lnHeight
   y2 = RAND() * lnHeight
   lnColor = RAND() * 0xFFFFFF
   loGfx.DrawLine(.Pen.New(.Color.FromRGB(lnColor),1),x1, y1, x2, y2)
ENDFOR

Although it is known that there are already some Captcha decoders, this might be useful for some situations. My goal in this post was just to show some techniques to create good captchas. There's a lot to be improved. You can use random and irregular fonts, other backgrounds, apply some transformations to characters, like scaling, shearing, blurring, halo effects. All this with GDI+ !
In the next release of the library, I hope to send some samples that create some interesting effects on texts, like the ones below, that might be useful for this too.


Be more productive with GdiPlusX

As I've read in one of Doug Hennig's great whitepapers, "IntelliSense, added in version 7, was likely the biggest productivity improvement ever added to VFP. It almost entirely eliminates the need to bring up the VFP help, even for little used commands and functions, because of how it provides tips on clauses and parameters in a context-sensitive manner".

When working with an extense library such as GdiPlus-X, Intellisense becomes really very important, because using it we can see easilly all the properties and methods for the current object. At this moment, there's no custom script for GdiPlus-X. However, we still can take huge benefits from that.


To see it working follow these steps:

1 - In the Command Window, or when initializing VFP, execute the code below and add it also to your source code:

DO LOCFILE("System.App")

If the GdiPlus-X library is not in your PATH, VFP will open a search window for you to point to the file "System.vcx"


2 - In the command window, type:

MODIFY COMMAND XYZ


3 - In the VFP Editor type the following:

LOCAL loBmp AS xfcBitmap
loBmp = _Screen.System.Drawing.Bitmap.FromFile(GETPICT())
loBmp.MakeT....


Very easy, isn't it ?

Basically, you have always to define your objects to have intellisense working for them, and to have the property / object "System" added to your VFP _Screen object.


You can still make things easier, creating your own Intellisense script, or just typing the following in the command window:

SET FUNCTION 5 TO "_Screen.System.Drawing"

and Voilá !

Every time that you type F5, automagically you'll be acessing all the "System.Drawing" namespace functions !

You can obtain more information about the library at this link: http://www.codeplex.com/VFPX/Wiki/View.aspx?title=GDIPlusX

If you want to participate in the project, coding, testing or reporting errors, feel free to use the Codeplex message boards and contact the GdiPlus-X team. Every help is very welcome.

Enjoy !

Resizing images with GdiPlusX


GDI+ brings many possibilities for resizing images from Visual FoxPro9. In this short post, I'll show 3 techniques, that can be applied depending on your needs.

IMPORTANT:
All samples below use the GDIPlus-X library, a VFPX project on GitHub.


Here they are:

1 - THUMBNAIL
Using very few code we can resize any image:

** How To: RESIZE with Thumbnail Technique
** This code resizes an Image to size 60x60
** Saves to a PNG file
DO LOCFILE("System.App") && GdiPlusX project on Github
WITH _SCREEN.System.Drawing
* Variables to store the new Image size
LOCAL lnWidth, lnHeight
STORE 60 TO lnWidth, lnHeight
* Load the original Image LOCAL loSrcImage as xfcBitmap
loSrcImage = .Bitmap.New(GETPICT())

* Get the thumbnail with the desired size LOCAL loThumbnail as xfcImage
loThumbnail = loSrcImage.GetThumbnailImage(lnWidth, lnHeight)
* Save the resized image as Png loResized.Save("c:\Resized1.png", .Imaging.ImageFormat.Png)
ENDWITH
RETURN

But there is a problem, that some kinds of Images like JPEGS may store embedded thumbnails. The function "GetThumbnailImage" in a first moment searches at the image file if there already exists a thumbnail stored. If yes, GDI+ will scale this image to the desired dimensions, causing some huge distortions.
In my opinion, this technique is recommended to be used to resize to small images, not bigger than 72x72.


2 - BITMAP LOADING
This code is also really short.

** How To: RESIZE with Bitmap loading Technique 
** The code resizes an Image to size 60x60 
** Saves to a PNG file

DO LOCFILE("System.App")

WITH _SCREEN.System.Drawing 
* Variables to store the new Image size 
LOCAL lnWidth, lnHeight 
STORE 60 TO lnWidth, lnHeight 
* Load the original Image LOCAL loSrcImage as xfcBitmap 
loSrcImage = .Bitmap.New(GETPICT()) 

* Get the resized version of the image 
LOCAL loResized as xfcBitmap 
loResized = .Bitmap.New(loSrcImage, lnWidth, lnHeight)

* Save the resized image as Png 
loResized.Save("c:\Resized2.png", .Imaging.ImageFormat.Png)

ENDWITH 
RETURN


The Bitmap class provides many overloads, that you can see at
http://msdn2.microsoft.com/en-us/library/System.Drawing.Bitmap.Bitmap%28vs.80%29.aspx
. One of them permits to load from any GDI+ image object, and automagically resizes it to the desired dimensions. Very easy, but it uses some default GDI+ properties, and does NOT ensure to generate the best possible quality.
This option is recommended for almost all cases when you need to rescale an image to a smaller size than the original.


3 - CUSTOMIZED RESIZING
The code below is longer, but permits to have a considerable control over the way our image is resized.

** How To: RESIZE with Image Drawing Technique 
** The code resizes an Image to size 60x60 
** Saves to a PNG file

** GDI+ gives you considerable control over the way your image is resampled, 
** so it makes sense to take advantage of this flexibility. 
** This way, we can obtain the most satisfactory image quality

DO LOCFILE("System.App")

WITH _SCREEN.System.Drawing

* Variables to store the new Image size 
LOCAL lnWidth, lnHeight 
STORE 60 TO lnWidth, lnHeight

* Load the original Image LOCAL loSrcImage as xfcBitmap 
loSrcImage = .Bitmap.New(GETPICT())

* Create a New Image with the desired size LOCAL loResized as xfcBitmap 
loResized = .Bitmap.New(lnWidth, lnHeight, ; 
   .Imaging.PixelFormat.Format32bppARGB)

* Set the image resolution to be the same as the original 
loResized.SetResolution(loSrcImage.HorizontalResolution, ; 
   loSrcImage.VerticalResolution)

* Obtain a Graphics object to get the rights to draw on it LOCAL loGfx as xfcGraphics 
loGfx = .Graphics.FromImage(loResized)

* Set some properties, to ensure to have a better quality of image loGfx.SmoothingMode = .Drawing2D.SmoothingMode.HighQuality 
loGfx.InterpolationMode = .Drawing2D.InterpolationMode.HighQualityBicubic

* Draw the source image on the new image at the desired dimensions 
loGfx.DrawImage(loSrcImage, 0, 0, lnWIdth, lnHeight)

* Save the resized image as Png 
loResized.Save("c:\Resized3.png", .Imaging.ImageFormat.Png)

ENDWITH 
RETURN

In this code we are controlling the Image Resolution, the Interpolation Mode, and the Smoothing Mode of the scaled image.
According to Libor Tinka, "Interpolation refers to how data is interpolated between endpoints. In its simplest form, to interpolate is to estimate a missing value by taking an average of known values at neighboring points."
In general the bicubic interpolation is used when more accuracy that's why I chose to use this mode for this sample.
Because of all these settings, this is the better option for resizing images to a bigger size than the original.

Libor Tinka wrote a very interesting article on this subjects, and provides many code samples and images showing the results that can be obtained using different Interpolation modes. Strongly recommended !
http://www.codeproject.com/csharp/imgresizoutperfg...

2012-02-27

Watermark your reports with FoxyPreviewer

Adding watermarks to reports is something that I've already blogged years ago during the development of GdiPlusX. In those times, we needed to create a specific ReportListener to manage the report pages, and draw the watermarks. We needed another external library, GdiPlusX, that was responsible for drawing at the report surface, and for applying some special effects to the images, such as transparencies and converting to grey scale.

Finally, we have this feature in FoxyPreviewer too ! That means that from now on, you can add watermarks to your reports without having absolutely any knowledge about GDI+ or ReportListeners, just by setting some few properties! In fact, by filling just one property you can have watermarks in all pages of your reports. In fact, this feature was asked by many people, but I had to postpone it because I had to implement to the original Gdi+ classes some new classes and functions, to create the transparencies and grey-scale effects. If you're curious, and want to check for these functions, have a look at the file pr_gdiplushelper.prg in the sources folder.

The usage is, as always, super simple. The only requirement is that you use FoxyPreviewer in the simplified mode.

Related properties:

cWatermarkImage - character, the name of the WM image. Important: this image MUST be stored locally, CAN'T be embedded in your EXE, obligatory property if you want to show the watermark. To remove the watermark from the next reports, just store an empty value to this property.

nWatermarkType - numeric, 1 = Colored (default), 2 = Converts the source image to grey scale, optional property

nWatermarkTransparency - numeric, from .10 to 1, default = 0.25, the transparency level of the WM image; 1 = Opaque, optional property

nWaterMarkWidthRatio - numeric, default = 0.75, the width size in proportion of the watermark in the report page, optional property

nWaterMarkHeightRatio  - numeric, default = 0.75, the height size in proportion of the watermark in the report page, optional property


Usage:

DO FoxyPreviewer.App
* Adding watermarks to reports
_Screen.oFoxyPreviewer.cWatermarkImage = ADDBS(HOME()) + "Graphics\Gifs\Morphfox.gif"
_Screen.oFoxyPreviewer.nWaterMarkType = 1 && 1 = Colored (default), 2 = B&W

_Screen.oFoxyPreviewer.nWatermarktransparency = .30 && (0-1) Transparency, 0 = Transparent, 1 = Opaque
_Screen.oFoxyPreviewer.nWaterMarkWidthRatio = .75 && (0-1) Proportion that the WM will occupy in page width
_Screen.oFoxyPreviewer.nWaterMarkHeightRatio = .75 && (0-1) Proportion that the WM will occupy in page height

REPORT FORM LOCFILE(_Samples + "\Solution\Reports\Colors.frx") PREVIEW


If you only set the "cWatermarkImage" property to a valid image file existing on the disk, you'll have your first watermark.
To reset your reports to the original settings, without the watermark, just clear the value of the property '.cWatermarkImage = "" '.


Samples:

Below you can see how the watermarks will appear, depending on the property values that you choose:


1 -
.nWatermarkType         = 1 && 1 = colored ; 2 = greyscale
.nWatermarkTransparency = 1 && 0 = transparent ; 1 = opaque
.nWatermarkWidthRatio   = 0.90 && 0 - 1
.nWatermarkHeightRatio  = 0.90 && 0 - 1 


2 -
.nWatermarkType         = 1 && 1 = colored ; 2 = greyscale
.nWatermarkTransparency = 0.25 && 0 = transparent ; 1 = opaque
.nWatermarkWidthRatio   = 0.50 && 0 - 1
.nWatermarkHeightRatio  = 0.50 && 0 - 1 


3 -
.nWatermarkType         = 2 && 1 = colored ; 2 = greyscale
.nWatermarkTransparency = 0.10 && 0 = transparent ; 1 = opaque
.nWatermarkWidthRatio   = 1.00 && 0 - 1
.nWatermarkHeightRatio  = 1.00 && 0 - 1


4 -
.nWatermarkType         = 2 && 1 = colored ; 2 = greyscale
.nWatermarkTransparency = 0.25 && 0 = transparent ; 1 = opaque
.nWatermarkWidthRatio   = 0.75 && 0 - 1
.nWatermarkHeightRatio  = 0.75 && 0 - 1


THOR Tools – A must have for all Foxers!!!

Thor is one of the newest VFPX projects, that brings probably the most helpful set of tools for VFP9 developers, bringing for FREE, TONS of features that were available only in other languages, or even as paid tools. As it’s described in the THOR main web page:

Thor is a tool for managing add-on tools in the IDE, managing menus and hot key assignments for IDE Tools.

But as you’ll see below, it’s much more than that !!!


Today I found myself having to do lots of data manipulations, and to create several SQL INSERT instructions. I remember to have seen a discussion running about this last year, so I decided to see if it was implemented already in THOR.

See how easy it is now for us to create our SQL (Insert, Update, Delete), Cursor creation and even Browsing !

Having THOR installed, just follow some few steps:


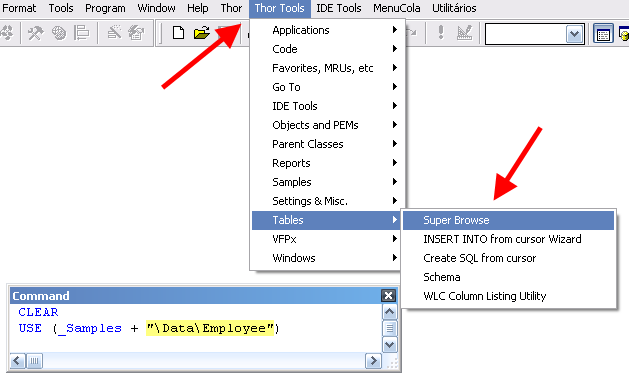
1 – Open the table that you want to work with, For example, I did:

USE (_Samples + "\Data\Employee")


2 – In the main menu, go to “Thor Tools”, “Tables” and “Super browse”

THAT’S ALL!!!

All the rest is super intuitive, no need of further explanations at all !


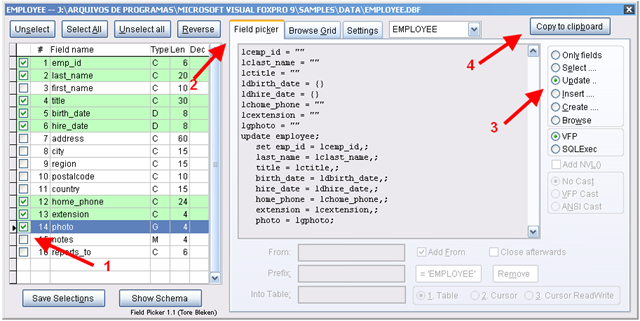
Then, it will open the window below, allowing you to:

1 - select the fields you desire
2 – Click on the “Field picker” tab
3 – At the right optio group panel, select and play with the options you need
4 – And Copy to the clipboard !!!


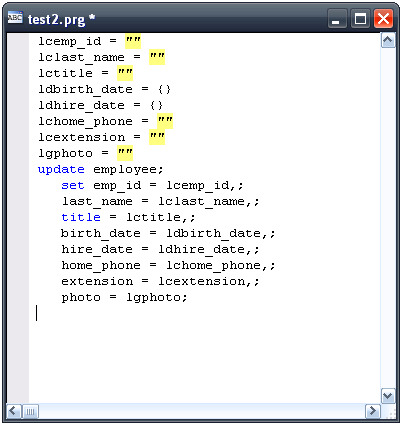
Paste the contents (CTRL+V) to have the script available in your Code window!


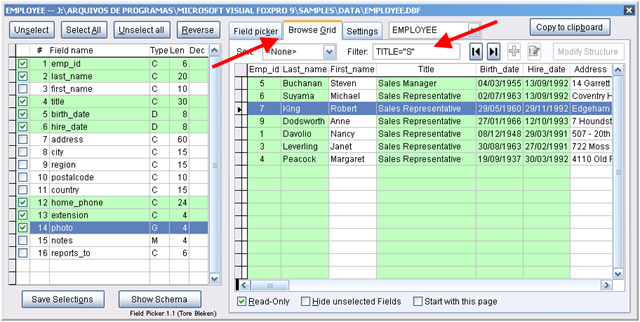
But there’s more… It’s a very nice table / cursor viewer, with filtering and other facilities


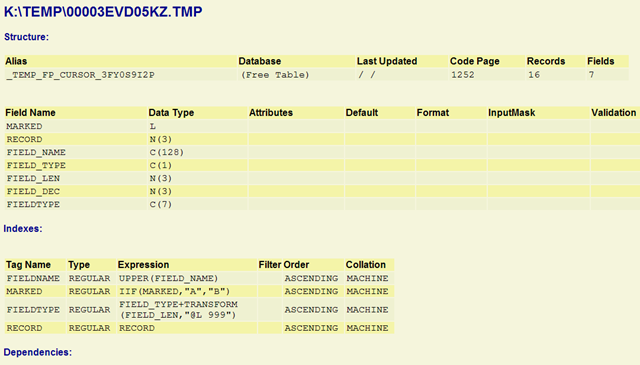
Need a schema for documenting ? Here it is !!!


Hey !!!

But there’s even more !!!


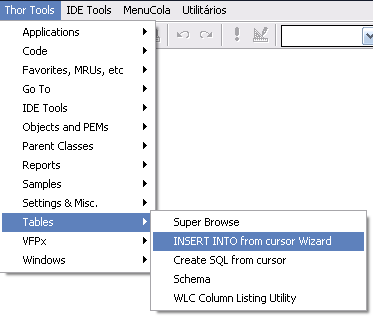
THOR brings another tool for a similar task! Again at the main menu, “Tables”, then “INSERT INTO from cursor Wizard”. The name says everything!


This project is under constant development. The architecture of THOR allows it to receive several tools from the community, so if you’re willing to offer any tool, just go ahead, and contact Jim Nelson, the project manager and creator of this gem. For example, the tools shown here were developed and offered by Tore Bleken, and included in THOR.

Visit the project pages, and see the documentation is online. Installing the tool will not take more than 3 minutes from you!

As always, the authors are always looking for feedback, please contact them via VFPX on CodePlex to let them know if you have any issues, or even to let them know it works fine !

Thanks again to Jim and Tore for these magnificent tools... They have saved my day!


UPDATE:

AND THERE'S EVEN MUCH MORE!!!

Jim Nelson, very kindly just sent me a list of more features, some of them ingenious, see:

Things you could not possibly know -- not a long list, but worth the effort.

(1) In the list of fields on the left, you can click on the column heading to sort by the column. This
also sorts the columns in the grid to match.

(2) When browsing the grid, you can click on a column heading to select a field. This is always
the way that I select fields, to make sure I am getting the right ones.

(3) Two buttons at the bottom -- you can turn off read-only so you can edit the table.  You can
decide to hide unselected fields -- just show the ones you want.

(4) "Save selections" allows you to your selection of fields for this table from one session to the next.

(5) There's a combobox at the top which shows the current table. You can use that to navigate to
other open tables.

(7) You can point to a table name in code and browse the table. You were working on the table
 'Employee'. If you saw that name in code, you can click on it and use the tool (you don't even have
to highlight the name) -- if the name matches an alias in use, it will SELECT it and browse it.
Otherwise it will try to USE it.  (There's a plug-in PRG that lets you customize this).  This is the
way I always use it.  ..... See a table name in code, click on it, browse it.  BAM! Can't imagine
doing it any other way.

(8) You can also call this using Dynamic Snippets, like this:
FP Employee {{Dynamic Snippet Tool}}
This actually pastes the code in for you directly (There's another button in this case).

2012-02-25

Full justified texts in Reports with FoxyPreviewer

A relative old feature, but that I missed to blog about is the possibility of adding justified texts in your report fields.
In FoxyPreviewer, that's really very very simple !
  • Select the field that you want to justify
  • Double-click that field to access the properties dialog
  • Select the "Other" Tab
  • Click "Edit User Data" button
  • Add the "<FJ>" tag in the textbox
That simple !
When you run your report, that field will appear justified.
This setting works also when you export your report to PDF, RTF and HTML!