2010-09-29

FoxyPreviewer features - SETTINGS DIALOG

The FoxyPreviewer settings dialog


An additional button in the print preview toolbar and in the context menu (via right clicking at the report preview canvas) calls the "settings definitions" dialog, that allows users to configure interactively 90% of the features of Foxypreviewer.

That means, that every user can determine lots of things related to his report preview definitions.

Users may choose very easilly how the toolbar will appear in the next section, what buttons will be visible, the buttons size, what output types will be available. From the toolbar or the context menu, click at this button, to open the dialog.
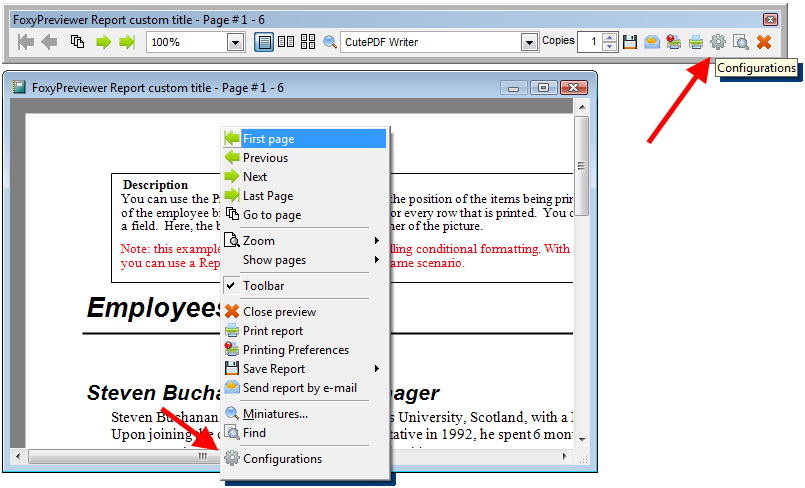

This dialog contains a pageframe with 7 different pages, as described below:


1 - General page
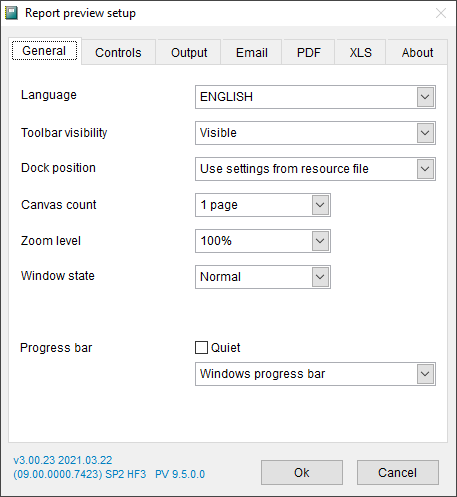


  • language - the combobox lets you change all your report dialogs, tooltips, and captions between 22 languages available: English, Portuguese, Spanish, French, German, Greek, Turkish, Italian, Polish, Indonesian, Czech, Persian, Swahili, Hebrew, Arabic, Indonesian, Russian, Dutch, Chinese, Bulgarian, Hungarian, Serbian, among others. At the source folder of Foxypreviewer you'll find the FOXYPREVIEWER_LOCS.DBF table. Please update it from times to times, because every time that a new feature is added, some new strings are included there. Of course, this permits to you to customize some of the texts showns in the dialogs.
  • toolbar visibility - here you define if in the next report preview session the toolbar will be visible, invisible, or if it will follow the resource file settings
  • dock position - determines how the toolbar will appear in the next session, undocked or docked. the combo allows you define the dock position as well.
  • canvas count - determines how many pages will be shown in the preview. choose between 1, 2 or 4 pages at the same time
  • zoom level - determines the zoom level that will be used in the next session
  • window state - choose between, normal, minimized or maximized report preview window
  • progressbar


    • quiet mode - determines if the progressbar will appear during the report generation and during the output generation. if you include the "nodialog" clause in your report, this setting will be ignored
    • progressbar type - choose between the default progressbar (not beautiful at all) or the coolest windows compatible progressbar, compatible with all windows versions, a courtesy of Carlos Alloatti and Dorin Vasilescu. Picture below:
  • version - at the bottom-left part of the dialog form you can see easilly some details of the current version used. Please report this version information if you suspect a bug, or need some assistance

2 - Controls page
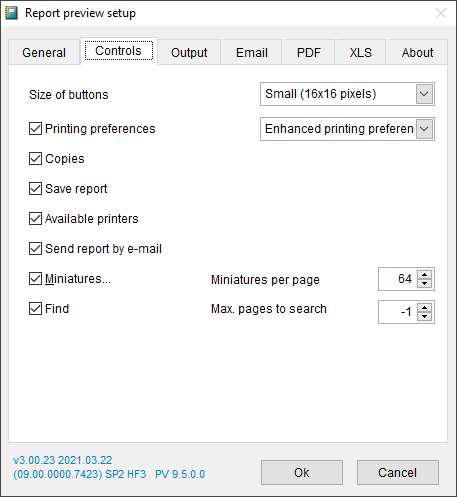


  • size of buttons - Determines the size of the buttons to be used - 16x16 or 32x32. Internally, foxypreviewer stores 2 button size options. Users may choose between these options. If you want to use your own buttons, go to the image folder, and replace with your own buttons. Make sure to use the same file names. after recompiling, your FoxyPreviewer.app version will show your pictures. Below you can see the toolbar in the big size (32x32)
  • printing preferences button - determines the visibility of the "Printing Preferences" button in the toolbar and context menu


    • preferences options: "Global printer prompt options" - shows the VFP9 default printer prompt dialog. This is the deprecated, but still flexible dialog; it allows your users to determine the printer for the output, change preferences, access an uninstalled printer from the LAN, etc. The disadvantage is that if the user clicks on the "cancel" button, the report preview will be closed.
    • preferences options: "Setup Property Sheet for the current printer" - shows the preferences dialog for the current printer. This will not allow you to switch to another printer, but if the user clicks on "Cancel", the preview will be restored.
    • preferences options: "Enhanced Printing Preferences dialog" - shows the new and enhanced Printing Preferences dialog of FoxyPreviewer v3.0. This brings a new and super flexible printing dialog form, bringing options available in the actual printing preview dialogs from other platforms.


  • copies - determines if the copies spinner will be shown in the toolbar. This control will allow your users to change the quantity of copies for the current report session.
  • save report - determines if the "save" button will be available in the toolbar and context menu. See in the next section how to determine which output file options you can make available.
  • available printers - determines if a combobox with all the available printers will be visible. This control will allow users to switch the printer output during the preview.
  • send report by e-mail - determines if the e-mail button will be visible. See in the 4th page information ( in the "e-mail" tab ) more instructions of usage
  • miniatures - determines if the miniatures preview form button will be visible in the preview toolbar and context menu
  • miniatures per page - determines the maximum quantity of miniatures that will be shown per page when you choose miniatures preview mode
  • find - determines if the search button will be available in the preview toolbar and context menu

    • max pages to search - determines the quantity of pages that the search engine will store information. When you have a really big report, of more than 200 pages, users will notice a very important performance difference, because during the report generation it will be saving information of all the fields from the report. Set the numeric value of "-1" to tell Foxypreviewer to perform the searches in all pages


3 - Output page
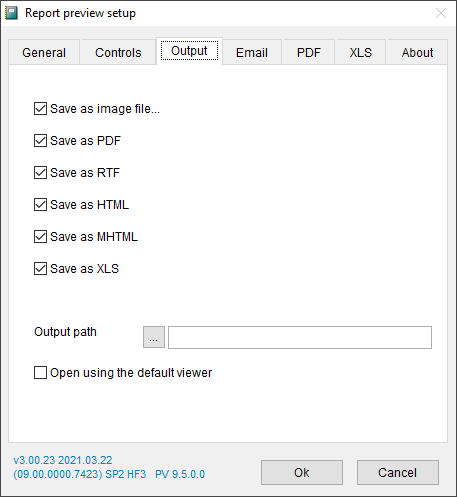


Here you can define what output options you'll have available in the "save report" menu, like in the picture below:


  • save as image file - determines if the save to image option will be available in the output options menu
  • save as PDF
  • save as HTML, MHTML
  • save as RTF
  • save as XLS
  • save as TXT / CSV / XL5
  • output path - determine the path / directory where the output files will be saved


4 - E-mail page
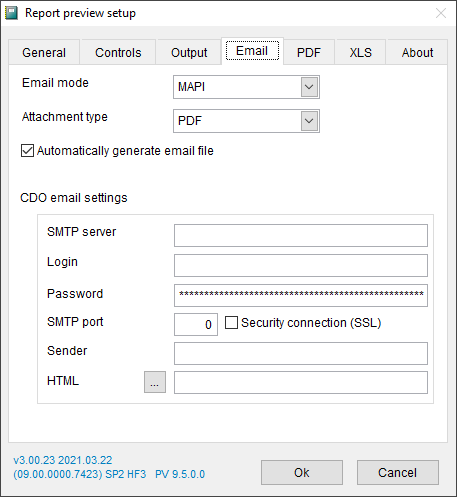


In this page you have several emailing options. Choose the one that you find the most appropriate for your case, OS, etc.


  • email mode - choose between MAPI, CDO, or your custom procedure.

    • MAPI - will fire your default MAPI compatible app, like Outlook Express, Office Outlook, Windows Live Mail, showing your report as an attachment. All you have to do is click on the "send" button. this does not always work. Please advice your users to make some tests before using this option.

    • CDO - uses the CDO2000 component included in windows 2000 and later. It allows you to send emails using an SMTP server. All settings must be accurate in order to make this work. For example, below is the configuration for a Hotmail or Live account to send emails. You may check also at Sergey Berezniker's blog for more information on how to send using MSN, Yahoo or Gmail email messages using CDO: http://www.berezniker.com/category/topic/email
    • custom procedure - You can use your own procedure to send the current report. Use Foxypreviewer property "cEmailPrg", and fill it with the name of the prg responsible for sending emails. This PRG receives as a parameter the file name of the file created that you will send as attachment. Have a look at the samples provided, the file MYSENDMAIL.PRG shows how you would need to make your custom procedure.
  • Attachment Type: determines the file type that will be used to convert the report to be sent by e-mail. Default is PDF, among XLS, RTF, HTML, TIF or PDF.
  • Automatically generate e-mail file: when not checked, FoxyPreviewer will ask the user first for the attachment type
  • CDO e-mail settings: Users can add their own settings for sending their e-mails. The 'HTML' textbox lets you store a simple HTML file, that will contain some texts to be inserted in your e-mails, such as a signature.


Foxypreviewer general info
Foxypreviewer documentation
FoxyPreviewer FAQS
Foxypreviewer downloads
2009-10-26

Extended MessageBox function - Updated ! - change button captions, main icon, disable buttons

Updated version - Now allowing changing icons and disabling buttons

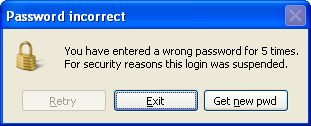
lnOption = MsgboxEx( ;
   "You have entered a wrong password for 5 times.
" + chr(13) + ;
   "For security reasons this login was suspended.", ; && main message
   0, ; && default icon info
   "Password incorrect", ; && title bar caption
   "\&Retry,&Exit,Get &new pwd", ; && new button captions
   "41.ico") && icon file


This is a simple function that allows us to customize the captions of buttons of the messagebox() dialog window, like in the image shown above.

Thanks to Mike gagnon and Anatolyi Mogylevetz, here's an updated version of the version that allows to change the icon and also to disable the buttons.

Basically I followed Anatolyi's instructions to allow disabling the buttons. Changing the dialog icon was also very simple, with a short research in his great site - Using Win32 functions in Visual Foxpro .

I just adapted a sample provided by Craig Boyd in his blog article - Bindevent on steroids using the VFPEX.FLL that he created and kindly provided in that article. Please refer to the original article for more details.

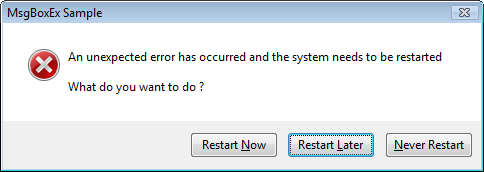
I called it MSGBOXEX.PRG, and it can be used very simply, to obtain the result below - notice the 4th parameter, that contains the captions of the buttons to be used, delimited by a comma:

lnOption = MsgboxEx(;
   "An unexpected error has occurred and the system needs to be restarted." + ;
   chr(13) + chr(13) + "What do you want to do ?", ;
   "X", ;
   "MsgboxEx sample", ;
   "Restart &Now,Restart &later,&Never restart")


lnOption = MsgboxEx( ;
   "Could not find the file 'Import.csv' in the selected folder.", ;
   0, ;
   "File not found", ;
   "&Abort,\&Retry,Change folder", ;
   "17.ico")


function: MsgboxEx.prg

description: Modifies the captions of messagebox buttons

parameters:

  • tcCaption - the text that appears in the dialog box.

  • tnIcon - the icon sign - can be numeric, using the default messagebox() icon values or character:
       - stop sign: 16 or "x"
       - question mark: 32 or "?"
       - exclamation point: 48 or "!"
       - information: 64 or "i"

  • tcTitle - the text that appears in the title bar of the dialog box

  • tcButtons - the captions to be used in the buttons using the comma "," delimiter
    use the "&" character to determine the hotkeys to be used - eg: "option&1,option&2,option&3" - the "\" backslash can be used to show the current button disabled.

  • tcIconFile - (optional) the icon image file


returns: The index number according to the option selected - eg. returns the value 3 if the 3rd button was selected.


pros:
  • use the same dialog interface from the messagebox() function, allowing us to easilly customize existing dialog boxes.
  • almost the same structure of parameters of the original function
  • behaves correctly in all operating systems.
  • allows hotkeys (thanks to thiago takehana for reminding about this possibility)

cons:
  • up to 3 buttons are allowed
  • size of buttons is limited to the original messagebox() buttons size, not allowing big sized buttons.


lparameters tccaption, tnicon, tctitle, tcbuttons, tciconfile
* msgboxex.prg
* description: modifies the captions of messagebox buttons
* prerequisites: needs vfpex.fll by craigboyd
* http://www.sweetpotatosoftware.com/spsblog/ct.ashx?id=f7644db8-b155-4d43-8216-4cfde233edb7&url=http%3a%2f%2fwww.sweetpotatosoftware.com%2ffiles%2fvfpex.zip
* more info about vfpex.fll
* http://www.sweetpotatosoftware.com/spsblog/2005/08/07/bindeventonsteroids.aspx
* parameters:
* tccaption - the text that appears in the dialog box.
* tnicon - the icon sign
* tctitle - the text that appears in the title bar of the dialog box
* tcbuttons - the captions to be used in the buttons using the comma "," delimiter
* use the "&" character to determine the hotkeys to be used - eg: "option&1,option&2,option&3"
* use a "\" to disable the button
* tciconfile - the icon file to replace the default from messagebox()
* returns: the index number according to the option selected - eg. returns the value 3 if the 3rd button was selected.
* sample:
* =msgboxex("this is a common text", "!", "window title", "option1,option2,option3")
if vartype(tntimeout) = "C" and (pcount() = 4)
   tcbuttons = tntimeout
   tntimeout = 0
endif

private pnbuttoncnt, pcbuttons, pnbutttype, pciconfile, phicon
pciconfile = iif(empty(tciconfile),"", tciconfile)
pnbuttoncnt = getwordcount(tcbuttons, ",")
pcbuttons = tcbuttons
*!* stop 16
*!* question 32
*!* exclamation 48
*!* info 64
if vartype(tnicon) = "c"
   tnicon = upper(tnicon)
   do case
   case tnicon = "X"
      tnicon = 16
   case tnicon = "?"
      tnicon = 32
   case tnicon = "!"
      tnicon = 48
   case tnicon = "I"
      tnicon = 64
   otherwise
      tnicon = 0
   endcase
endif

* check if an icon will be shown
* if an icon file was passed, we need to ensure that messagebox() will
* show an icon, that will be changed further.

#define image_bitmap 0
#define image_icon 1
#define lr_loadfromfile 0x0010
#define lr_defaultsize 0x0040
phicon = 0
if not empty(pciconfile) and ;
   (not (bittest(tnicon, 4) or bittest(tnicon, 5) or bittest(tnicon, 6)))
   tnicon = tnicon + 16
   phicon = xmbloadimage(0, fullpath(pciconfile), image_icon,;
0,0, lr_loadfromfile + lr_defaultsize)
endif


* windows hook constants
#define wh_cbt 5

* set library so bindeventex and unbindeventex can be used in vfp
local lcoldsetlib
lcoldsetlib = set("library")
set library to (locfile("vfpex.fll"))
bindeventex('wineventhandler()', wh_cbt) && setwindowshookex

* this messagebox will be modified before it is shown
local lnoption, lnindex
do case
case pnbuttoncnt = 1
   pnbutttype = 0 && ok
case pnbuttoncnt = 2
   pnbutttype = 4 && yes / no
case pnbuttoncnt = 3
   pnbutttype = 2 && abort / retry / ignore
otherwise
endcase

lnoption = messagebox(tccaption, tnicon + pnbutttype, tctitle)

local lnoffset
lnoffset = icase(pnbuttoncnt = 3, 2, pnbuttoncnt = 2, 5 , 0)
lnindex = lnoption - lnoffset

if phicon <> 0
   =xmbdeleteobject(phicon) && clear icon handle
endif 

if not empty(lcoldsetlib)
   set library to (lcoldsetlib)
endif
return lnindex


procedure wineventhandler
#define dlg_ctrlid_icon 0x0014
#define stm_seticon 0x0170
#define stm_setimage 0x0172
if ncode == 5
   if not empty(phicon)
      * changing the dialog icon
      local lhiconwindow
      lhiconwindow = xmbgetdlgitem(wparam, dlg_ctrlid_icon)
      if lhiconwindow <> 0
         if phicon <> 0
            =xmbsendmessage(lhiconwindow, stm_seticon, phicon, 0)
         endif
      endif
   endif

   * change button attributes
   local n, lnoffset, lccaption
   lnoffset = icase(pnbuttoncnt = 3, 2, pnbuttoncnt = 2, 5 , 0)
   for n = 1 to pnbuttoncnt
      lccaption = getwordnum(pcbuttons, n, ",")
      * disable current button
      if left(lccaption, 1) = "\"
         lccaption = substr(lccaption, 2) && get the rest of the string
         local lnbtnhwnd
         lnbtnhwnd = xmbgetdlgitem(wparam, lnoffset + n)
         =xmbenablewindow(lnbtnhwnd, 0)
      endif

      * change the caption
      =xmbsetdlgitemtext(wparam, lnoffset + n, lccaption)
   endfor

   =xmbcallnexthookex(hhook, ncode, wparam, lparam) && all 4 variables exist
   unbindeventex()
else
   =xmbcallnexthookex(hhook, ncode, wparam, lparam) && all 4 variables created by fll
endif

release ncode, wparam, lparam, hhook
endproc


*********************************************************************
function xmbsetdlgitemtext(hdlg, niddlgitem, lpstring)
*********************************************************************
declare integer SetDlgItemText in user32 as xmbsetdlgitemtext ;
   long hdlg,;
   long niddlgitem,;
   string lpstring
return xmbsetdlgitemtext(hdlg, niddlgitem, lpstring)
endfunc

*********************************************************************
function xmbcallnexthookex(hhook, ncode, wparam, lparam)
*********************************************************************
declare long CallNextHookEx in user32 as xmbcallnexthookex ;
   long hhook, long ncode, long wparam, long lparam
return xmbcallnexthookex(hhook, ncode, wparam, lparam)
endfunc

*********************************************************************
function xmbgetdlgitem(hdlg, niddlgitem)
*********************************************************************
* hdlg [in] handle to the dialog box that contains the control.
* niddlgitem [in] specifies the identifier of the control to be retrieved.
* http://msdn.microsoft.com/en-us/library/ms645481(vs.85).aspx
declare integer GetDlgItem in user32 as xmbgetdlgitem ;
   long hdlg,;
   long niddlgitem
return xmbgetdlgitem(hdlg, niddlgitem)
endfunc

*********************************************************************
function xmbenablewindow(hwnd, fenable)
*********************************************************************
declare integer EnableWindow in user32 as xmbenablewindow integer hwnd, integer fenable
return xmbenablewindow(hwnd, fenable)
endfunc

*********************************************************************
function xmbsendmessage(hwindow, msg, wparam, lparam)
*********************************************************************
* http://msdn.microsoft.com/en-us/library/bb760780(vs.85).aspx
* http://www.news2news.com/vfp/?group=-1&function=312
declare integer SendMessage in user32 as xmbsendmessage;
   integer hwindow, integer msg,;
   integer wparam, integer lparam
return xmbsendmessage(hwindow, msg, wparam, lparam)
endfunc

*********************************************************************
function xmbloadimage(hinst, lpszname, utype, cxdesired, cydesired, fuload)
*********************************************************************
declare integer LoadImage in user32 as xmbloadimage;
   integer hinst,;
   string lpszname,;
   integer utype,;
   integer cxdesired,;
   integer cydesired,;
   integer fuload
return xmbloadimage(hinst, lpszname, utype, cxdesired, cydesired, fuload)
endfunc
 

*********************************************************************
function xmbdeleteobject(hobject)
*********************************************************************
declare integer DeleteObject in gdi32 as xmbdeleteobject integer hobject
return xmbdeleteobject(hobject)
endfunc


download the vfpex.fll here, created by craig boyd, directly from the sps weblog.
download the MessageboxEx function  

History:

2009-10-19 original version (change captions)
2009-10-23 updated, allowing icon change and disabling buttons


2009-10-22

A GdiPlusX analog clock

After I posted a Gauge sample with gdiplusx some months ago, Rafael Lippert from Brazil adapted my original code and created this cool analog watch, using GdiplusX and the 'ImageCanvas' class:


Cool isn't it ? it permits many customizations, and you may use it as a sample to learn other GdiplusX techniques.

You may get it directly from Rafael' blog, at: http://rafaellippert.wordpress.com/2011/06/21/a-gdiplusx-analog-clock/

It's worth to spend some time in Rafael's blog and website - www.lipsil.com.br . I'm sure you'll find some really very neat utilities.

2009-07-30

Draw rounded rectangles with GdiPlusX

Bob Powell, in his great website site says: "the trick here is to use a GraphicsPath object to assemble a collection of  lines and arcs that make up the rounded rectangle shape.

Arcs are used to round off the corners, so you have to position the lines 1 radius, whatever that may be, from the actual corner."


The code below shows Bob's function converted to VFP and GdiPlusX, to obtain this result:


LOCAL loBmp AS xfcBitmap, loGfx AS xfcGraphics
WITH _SCREEN.SYSTEM.Drawing AS xfcDrawing
 * create a New Bitmap
 loBmp = .Bitmap.New(200,170)
 * get a Graphics object for Drawing
 loGfx = .Graphics.fromImage(loBmp)
 * clear the Drawing canvas
 loGfx.CLEAR(.COLOR.LightCoral)
 * Draw the rounded rectangle
 =DrawRoundRect(loGfx, .Pens.blue, 20, 30, 150, 100, 20)
 * save image to file
 loBmp.SAVE("roundedrect.png", .Imaging.ImageFormat.Png)
ENDWITH
RUN /N explorer.EXE RoundedRect.png


FUNCTION DrawRoundRect(toGfx AS xfcGraphics, toPen AS xfcPen, ;
  tnX, tnY, tnWidth, tnHeight, tnRadius)
 * adapted by cesar from bob powell's sample taken from
 * http://www.bobpowell.net/roundrects.htm

 LOCAL logPath AS xfcGraphicsPath
 logPath = _SCREEN.SYSTEM.Drawing.Drawing2d.GraphicsPath.New()

 WITH logPath
  .AddLine(tnX + tnRadius, tnY, tnX + tnWidth - (tnRadius*2), tnY)
  .AddArc(tnX + tnWidth - (tnRadius*2), tnY, tnRadius*2, tnRadius*2, 270, 90)
  .AddLine(tnX + tnWidth, tnY + tnRadius, tnX + tnWidth, tnY + tnHeight - (tnRadius*2))
  .AddArc(tnX + tnWidth - (tnRadius*2), tnY + tnHeight - (tnRadius*2), tnRadius*2, tnRadius*2,0,90)
  .AddLine(tnX + tnWidth - (tnRadius*2), tnY + tnHeight, tnX + tnRadius, tnY + tnHeight)
  .AddArc(tnX, tnY + tnHeight - (tnRadius*2), tnRadius*2, tnRadius*2, 90, 90)
  .AddLine(tnX, tnY + tnHeight - (tnRadius*2), tnX, tnY + tnRadius)
  .AddArc(tnX, tnY, tnRadius*2, tnRadius*2, 180, 90)
  .closefigure()
 ENDWITH
 toGfx.DrawPath(toPen, logPath)
ENDFUNC


The above function receives a xfcPen object to draw the rounded rectangle. In order to draw a filled rounded rectangle, all we need is to add a small tweak in the above function to use a brush object instead a pen, and call the FillPath function instead of DrawPath.

2009-07-06

Drawing shapes using the PolyPoints property

vfp9 brought a new property that allows us to draw all kinds of shapes, without the need of any external component, even a single windoes api call.


according to the vfp9 help, the polypoints property of the shape control "specifies an array of coordinates for creating polygon shapes using the shape control and polygon lines using the line control. read/write at design time and run time. for shape controls, polypoints creates a polygon shape."


mvp luis maria guayan from argentina already did an amazing job using the polypoints property, in 2 articles.


dibujando polígonos con vfp 9.0 - a simple article with some samples showing how we can draw a traiangle and an ogtogon. the article is in spanish, but it is very simple to run the provided samples and reproduce the proposed result.


the 2nd one, gráficas con objetos 100% vfp, is a real masterpiece, where he uses the polypoints property to create chart shapes, providing a very nice charting tool. download the source code and play with the samples, amazing !


using the polypoints property we can also draw rounded shapes, pie slices, circles and ellipses.


create an empty form, size it the way you like, and paste the following code to the init() event, to reproduce the shape below:


thisform.addobject("shape1", "shape")
* add a shape object to the current form
* and set some basic properties
local loshape
as shape
loshape = thisform
.shape1
loshape.
width = thisform.
width
loshape.height = thisform.
height
loshape.anchor = 15
&& resize width and height
loshape.backcolor = rgb
(255,0,0)
loshape.
polypoints = "apoly"
&& array of points
loshape.visible
= .t.
 
* defining the polypoints array
* change the values of lnstart and lnfinal to determine
* the angle of the pie slice
local
lnstart, lnfinal, lnsweep, n, lnradius, lnangle
lnstart = 0
lnfinal = 360

lnsweep = lnfinal - lnstart
lnradius = 50


public apoly(lnsweep + 2, 2)
for n = 1 to
lnsweep + 1
   lnangle = lnstart + n - 1
   apoly(n,1) = (lnradius *
cos(dtor
(lnangle)) + lnradius)
   apoly(n,2) = (lnradius *
sin(dtor
(lnangle)) + lnradius)
endfor


if lnsweep = 360 && closed ellipse, so dont draw the center point
   apoly(n,1) = apoly(n-1,1)
   apoly(n,2) = apoly(n-1,2)
else
   * determine the center point
   apoly(n,1) = lnradius
   apoly(n,2) = lnradius
endif


to obtain pie slices, just change the values of the variables lnstart and lnfinal, to determine the starting and ending angle.


here's the result if you use:


lnstart = 90
lnfinal = 210


the very cool feature of polypoints is that it generates vectorial pictures. you can resize the form the way you like, and you'll see your shape changing accordingly. all i did for that purpose was to setup the property anchor to the value 15 (resize width and height).


2009-07-01

Change the shape of your pictures with GdiPlusX

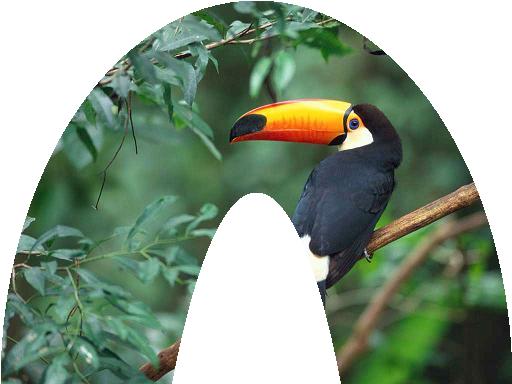
The samples below use the Graphics.SetClip function to draw shaped borders in your pictures.

The trick here is to use the CombineMode.Xor enumeration, that forces the drawing to the external part of the shape, like in the samples below.

We'll be playing with the source image below:


Prerequisites
Visual FoxPro 9 and the GdiplusX library from VFPX 


Sample 1: Ellipse Shape

DO LOCFILE("System.App") WITH _SCREEN.SYSTEM.Drawing * get an image file LOCAL loBmp AS xfcBitMap m.loBmp = .BITMAP.FromFile(GETPICT()) * create a gfx object that will allow us to make the transformation LOCAL loGfx AS xfcGraphics m.loGfx = .Graphics.FromImage(m.loBmp) LOCAL lnWidth, lnHeight m.lnWidth = m.loBmp.WIDTH m.lnHeight = m.loBmp.HEIGHT * create graphicsPath object. LOCAL loClipPath AS xfcGraphicsPath m.loClipPath = .Drawing2d.GraphicsPath.New() * an Ellipse shape m.loClipPath.AddEllipse(0, 0, m.lnWidth, m.lnHeight) * set Clipping region to Path. * CombineMode enumeration * http://msdn.microsoft.com/en-us/library/system.Drawing.Drawing2d.CombineMode.aspx * CombineMode.xor - two Clipping regions are combined by taking only the areas * enclosed by one or the other region, but not both. m.loGfx.SetClip(m.loClipPath, ; _SCREEN.SYSTEM.Drawing.Drawing2d.CombineMode.xor) * fill Rectangle to demonstrate Clipping region. m.loGfx.FillRectangle( .Brushes.White, 0, 0, m.loBmp.WIDTH, m.loBmp.HEIGHT) * save the image to the disk and show m.loBmp.SAVE("Clipped.jpg", "image/jpeg") RUN /N Explorer.EXE Clipped.jpg ENDWITH


Sample 2: Doughnut Shape


DO LOCFILE("System.App")
WITH _SCREEN.SYSTEM.Drawing
 * get an image file
 LOCAL loBmp AS xfcBitMap
 m.loBmp = .BITMAP.FromFile(GETPICT())
 * create a gfx object that will allow us to make the transformation
 LOCAL loGfx AS xfcGraphics
 m.loGfx = .Graphics.FromImage(m.loBmp)
 LOCAL lnWidth, lnHeight
 m.lnWidth  = m.loBmp.WIDTH
 m.lnHeight = m.loBmp.HEIGHT

 * create graphicsPath object.
 LOCAL loClipPath AS xfcGraphicsPath
 m.loClipPath = .Drawing2d.GraphicsPath.New()


 * a doughnut slice shape
 m.loClipPath.AddEllipse(0, 0, m.lnWidth, m.lnHeight * 2)
 m.loClipPath.AddEllipse(m.lnWidth / 4, m.lnHeight / 2, m.lnWidth / 2, m.lnHeight * 4)


 * set Clipping region to Path.
 * CombineMode enumeration
 * http://msdn.microsoft.com/en-us/library/system.Drawing.Drawing2d.CombineMode.aspx
 * CombineMode.xor - two Clipping regions are combined by taking only the areas 
 * enclosed by one or the other region, but not both. 
 m.loGfx.SetClip(m.loClipPath, ;
    _SCREEN.SYSTEM.Drawing.Drawing2d.CombineMode.xor)
 * fill Rectangle to demonstrate Clipping region.
 m.loGfx.FillRectangle( .Brushes.White, 0, 0, m.loBmp.WIDTH, m.loBmp.HEIGHT)
 * save the image to the disk and show
 m.loBmp.SAVE("Clipped.jpg", "image/jpeg")
 RUN /N Explorer.EXE Clipped.jpg
ENDWITH


Sample 3: Star Shape


DO LOCFILE("System.App")
WITH _SCREEN.SYSTEM.Drawing
 * get an image file
 LOCAL loBmp AS xfcBitMap
 m.loBmp = .BITMAP.FromFile(GETPICT())
 * create a gfx object that will allow us to make the transformation
 LOCAL loGfx AS xfcGraphics
 m.loGfx = .Graphics.FromImage(m.loBmp)
 LOCAL lnWidth, lnHeight
 m.lnWidth  = m.loBmp.WIDTH
 m.lnHeight = m.loBmp.HEIGHT

 * create graphicsPath object.
 LOCAL loClipPath AS xfcGraphicsPath
 m.loClipPath = .Drawing2d.GraphicsPath.New()


 * source for the star Drawing
 * http://www.java2s.com/code/vb/2d/graphicsPathdrawwithfillmodewinding.htm
 LOCAL lnRadius, lnpi, lnRadian72, N, lnEdges
 m.lnRadius  = m.lnHeight / 2
 m.lnpi   = 3.141592
 m.lnEdges  = 5
 m.lnRadian72 = (m.lnpi * 4.0 ) / m.lnEdges
 LOCAL laPoints(lnEdges)
 FOR m.N = 1 TO m.lnEdges
  m.laPoints(m.N) = .Point.New( ;
     + m.lnRadius * SIN( m.N * m.lnRadian72 ) + m.lnRadius, ;
     - m.lnRadius * COS( m.N * m.lnRadian72 ) + m.lnRadius )
 ENDFOR
 m.loClipPath.AddPolygon(@m.laPoints)
 * set the Clip mode to winding
 * Clipmode enumeration
 *http://msdn.microsoft.com/en-us/library/system.Drawing.Drawing2d.Fillmode.aspx
 m.loClipPath.Fillmode = _SCREEN.SYSTEM.Drawing.Drawing2d.Fillmode.winding

 * set Clipping region to Path.
 * CombineMode enumeration
 * http://msdn.microsoft.com/en-us/library/system.Drawing.Drawing2d.CombineMode.aspx
 * CombineMode.xor - two Clipping regions are combined by taking only the areas 
 * enclosed by one or the other region, but not both. 
 m.loGfx.SetClip(m.loClipPath, ;
    _SCREEN.SYSTEM.Drawing.Drawing2d.CombineMode.xor)
 * fill Rectangle to demonstrate Clipping region.
 m.loGfx.FillRectangle( .Brushes.White, 0, 0, m.loBmp.WIDTH, m.loBmp.HEIGHT)
 * save the image to the disk and show
 m.loBmp.SAVE("Clipped.jpg", "image/jpeg")
 RUN /N Explorer.EXE Clipped.jpg
ENDWITH


Notice that the only difference between the code samples is the shape definition !

2009-04-24

Circular Gauge chart with GdiPlusX

Drawing shapes with gdiplusx is super easy, and we can very easilly transport this to solve some of our chart needs.

Here we have a very primitive sample for creating circular gauge charts. Obviously I hope to apply the techniques shown here in FoxCharts. But FoxCharts is getting big, and I confess that learning from the methods in FoxCharts may not be easy for people that are not that familiar with GdiPlusX.

This is an unfinished sample. I'm posting it here to let people see that drawing is not that complicated. Just using some imagination, merging it with some geometrical thoughts, and voilá !


Download the gauge sample, unzip and run testgauge.scx ! I'm including the GdiplusX sources to let everybody immediately run the samples.

Notice that you can control the colors of the background and pointer.

The pointer shape can be modified too. Play with all the spinners to modify the shape and size!

Below is the relevant code for the circular gauge drawing. You'll find it in the "beforedraw()" event of the ImageCanvas class. It extracts the information from the form controls, and it's very easy to adapt it to your needs.


LOCAL lnangle, lnbasew, lnbasex, lnbasey, lntopw, lnheightpercent, lntopy
LOCAL lntype, lnpointclr, lnbackclr, lnticks
lnticks = Thisform.spnticks.VALUE
lntype = Thisform.optshape.VALUE
lnangle = Thisform.spnangle.VALUE
lnbasew = Thisform.spnbottomw.VALUE
lntopw = Thisform.spntopw.VALUE
lnbasex = This.WIDTH/2 -lnbasew/2
lnbasey = This.HEIGHT/2
lnheightpercent = Thisform.spnheight.VALUE / 100
lntopy = lnbasey - (lnbasey * lnheightpercent) + lntopw / 2
lnpointclr = Thisform.shppointercolor.BACKCOLOR
lnbackclr = Thisform.shpbackcolor.BACKCOLOR
LOCAL logfx AS xfcgraphics
logfx = This.ogfx

WITH _SCREEN.SYSTEM.drawing
 LOCAL lobrush AS xfcsolidbrush
 lobrush = .solidbrush.new(.COLOR.fromrgb(lnpointclr))

 logfx.CLEAR(.COLOR.fromrgb(Thisform.BACKCOLOR))

 * create a shape for the pointer
 LOCAL lopath AS xfcgraphicspath
 lopath = .drawing2d.graphicspath.new()
 lopath.startfigure()
 logfx.fillellipse(.solidbrush.new(.COLOR.fromrgb(lnbackclr)), ;
  This.rectangle)

 IF lntype = 1
  lopath.addarc(lnbasex, This.HEIGHT/2 -lnbasew/2, lnbasew, lnbasew, 0, 180)
 ENDIF

 lopath.ADDLINE(lnbasex, lnbasey, This.WIDTH/2 - lntopw/2, lntopy)
 IF lntype = 1
  LOCAL lapoints(3)
  lapoints(1) = .POINT.new(This.WIDTH/2 - lntopw/2, lntopy)
  lapoints(2) = .POINT.new(This.WIDTH/2 , lntopy - lntopw / 2)
  lapoints(3) = .POINT.new(This.WIDTH/2 + lntopw/2, lntopy)
  lopath.addcurve(@lapoints)
 ENDIF

 lopath.ADDLINE( This.WIDTH/2 + lntopw/2, lntopy, lnbasex + lnbasew, lnbasey)
 lopath.closefigure()

 * rotate the shape pointer
 logfx.translatetransform(This.WIDTH/2, This.HEIGHT/2)
 logfx.rotatetransform(lnangle)
 logfx.translatetransform(- This.WIDTH/2, - This.HEIGHT/2)

 * draw the pointer
 logfx.fillpath(lobrush, lopath)

 * restore the original gfx rotation state
 logfx.resettransform()

 IF lnticks > 0
  FOR lnangle = 0 TO 360 STEP 360 / lnticks

   * rotate the gfx
   logfx.translatetransform(This.WIDTH/2, This.HEIGHT/2)
   logfx.rotatetransform(lnangle)
   logfx.translatetransform(- This.WIDTH/2, - This.HEIGHT/2)

   * draw the ticks
   logfx.drawline(.pens.black, This.WIDTH/2, 0, This.WIDTH/2, 10)

   * restore the original gfx rotation state
   logfx.resettransform()
  ENDFOR
 ENDIF

ENDWITH