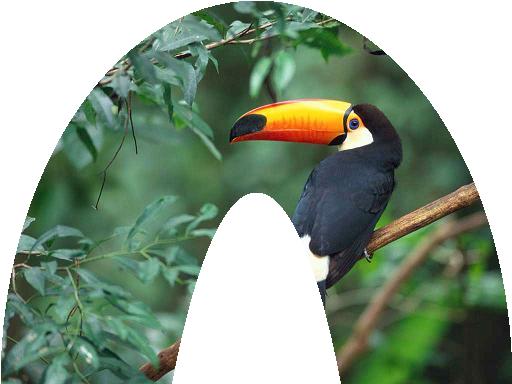
The trick here is to use the CombineMode.Xor enumeration, that forces the drawing to the external part of the shape, like in the samples below.
We'll be playing with the source image below:

Prerequisites
Visual FoxPro 9 and the GdiplusX library from VFPX

Sample 1: Ellipse Shape
DO LOCFILE("System.App") WITH _SCREEN.SYSTEM.Drawing * get an image file LOCAL loBmp AS xfcBitMap m.loBmp = .BITMAP.FromFile(GETPICT()) * create a gfx object that will allow us to make the transformation LOCAL loGfx AS xfcGraphics m.loGfx = .Graphics.FromImage(m.loBmp) LOCAL lnWidth, lnHeight m.lnWidth = m.loBmp.WIDTH m.lnHeight = m.loBmp.HEIGHT * create graphicsPath object. LOCAL loClipPath AS xfcGraphicsPath m.loClipPath = .Drawing2d.GraphicsPath.New() * an Ellipse shape m.loClipPath.AddEllipse(0, 0, m.lnWidth, m.lnHeight) * set Clipping region to Path. * CombineMode enumeration * http://msdn.microsoft.com/en-us/library/system.Drawing.Drawing2d.CombineMode.aspx * CombineMode.xor - two Clipping regions are combined by taking only the areas * enclosed by one or the other region, but not both. m.loGfx.SetClip(m.loClipPath, ; _SCREEN.SYSTEM.Drawing.Drawing2d.CombineMode.xor) * fill Rectangle to demonstrate Clipping region. m.loGfx.FillRectangle( .Brushes.White, 0, 0, m.loBmp.WIDTH, m.loBmp.HEIGHT) * save the image to the disk and show m.loBmp.SAVE("Clipped.jpg", "image/jpeg") RUN /N Explorer.EXE Clipped.jpg ENDWITH

Sample 2: Doughnut Shape
DO LOCFILE("System.App")
WITH _SCREEN.SYSTEM.Drawing
 * get an image file
 LOCAL loBmp AS xfcBitMap
 m.loBmp = .BITMAP.FromFile(GETPICT())
 * create a gfx object that will allow us to make the transformation
 LOCAL loGfx AS xfcGraphics
 m.loGfx = .Graphics.FromImage(m.loBmp)
 LOCAL lnWidth, lnHeight
 m.lnWidth  = m.loBmp.WIDTH
 m.lnHeight = m.loBmp.HEIGHT

 * create graphicsPath object.
 LOCAL loClipPath AS xfcGraphicsPath
 m.loClipPath = .Drawing2d.GraphicsPath.New()


 * a doughnut slice shape
 m.loClipPath.AddEllipse(0, 0, m.lnWidth, m.lnHeight * 2)
 m.loClipPath.AddEllipse(m.lnWidth / 4, m.lnHeight / 2, m.lnWidth / 2, m.lnHeight * 4)


 * set Clipping region to Path.
 * CombineMode enumeration
 * http://msdn.microsoft.com/en-us/library/system.Drawing.Drawing2d.CombineMode.aspx
 * CombineMode.xor - two Clipping regions are combined by taking only the areas
 * enclosed by one or the other region, but not both.
 m.loGfx.SetClip(m.loClipPath, ;
    _SCREEN.SYSTEM.Drawing.Drawing2d.CombineMode.xor)
 * fill Rectangle to demonstrate Clipping region.
 m.loGfx.FillRectangle( .Brushes.White, 0, 0, m.loBmp.WIDTH, m.loBmp.HEIGHT)
 * save the image to the disk and show
 m.loBmp.SAVE("Clipped.jpg", "image/jpeg")
 RUN /N Explorer.EXE Clipped.jpg
ENDWITH

Sample 3: Star Shape
DO LOCFILE("System.App")
WITH _SCREEN.SYSTEM.Drawing
 * get an image file
 LOCAL loBmp AS xfcBitMap
 m.loBmp = .BITMAP.FromFile(GETPICT())
 * create a gfx object that will allow us to make the transformation
 LOCAL loGfx AS xfcGraphics
 m.loGfx = .Graphics.FromImage(m.loBmp)
 LOCAL lnWidth, lnHeight
 m.lnWidth  = m.loBmp.WIDTH
 m.lnHeight = m.loBmp.HEIGHT

 * create graphicsPath object.
 LOCAL loClipPath AS xfcGraphicsPath
 m.loClipPath = .Drawing2d.GraphicsPath.New()


 * source for the star Drawing
 * http://www.java2s.com/code/vb/2d/graphicsPathdrawwithfillmodewinding.htm
 LOCAL lnRadius, lnpi, lnRadian72, N, lnEdges
 m.lnRadius  = m.lnHeight / 2
 m.lnpi   = 3.141592
 m.lnEdges  = 5
 m.lnRadian72 = (m.lnpi * 4.0 ) / m.lnEdges
 LOCAL laPoints(lnEdges)
 FOR m.N = 1 TO m.lnEdges
  m.laPoints(m.N) = .Point.New( ;
     + m.lnRadius * SIN( m.N * m.lnRadian72 ) + m.lnRadius, ;
     - m.lnRadius * COS( m.N * m.lnRadian72 ) + m.lnRadius )
 ENDFOR
 m.loClipPath.AddPolygon(@m.laPoints)
 * set the Clip mode to winding
 * Clipmode enumeration
 *http://msdn.microsoft.com/en-us/library/system.Drawing.Drawing2d.Fillmode.aspx
 m.loClipPath.Fillmode = _SCREEN.SYSTEM.Drawing.Drawing2d.Fillmode.winding

 * set Clipping region to Path.
 * CombineMode enumeration
 * http://msdn.microsoft.com/en-us/library/system.Drawing.Drawing2d.CombineMode.aspx
 * CombineMode.xor - two Clipping regions are combined by taking only the areas
 * enclosed by one or the other region, but not both.
 m.loGfx.SetClip(m.loClipPath, ;
    _SCREEN.SYSTEM.Drawing.Drawing2d.CombineMode.xor)
 * fill Rectangle to demonstrate Clipping region.
 m.loGfx.FillRectangle( .Brushes.White, 0, 0, m.loBmp.WIDTH, m.loBmp.HEIGHT)
 * save the image to the disk and show
 m.loBmp.SAVE("Clipped.jpg", "image/jpeg")
 RUN /N Explorer.EXE Clipped.jpg
ENDWITH

Notice that the only difference between the code samples is the shape definition !
No comments:
Post a Comment