2012-02-25

Full justified texts in Reports with FoxyPreviewer

A relative old feature, but that I missed to blog about is the possibility of adding justified texts in your report fields.
In FoxyPreviewer, that's really very very simple !
  • Select the field that you want to justify
  • Double-click that field to access the properties dialog
  • Select the "Other" Tab
  • Click "Edit User Data" button
  • Add the "<FJ>" tag in the textbox
That simple !
When you run your report, that field will appear justified.
This setting works also when you export your report to PDF, RTF and HTML!


2012-02-23

Full Justified Texts with GdiPlus-X

 According to Wikipedia, "In typesettingjustification (can also be referred to as 'full justification') is the typographic alignment setting of text or images within a column or "measure" to align along both the left and right margin. Text set this way is said to be "justified".


In justified text, the spaces between words, and, to a lesser extent, between glyphs or letters (kerning), are stretched or sometimes compressed in order to make the text align with both the left and right margins. When using justification, it is customary to treat the last line of a paragraph separately by left or right aligning it, depending on the language direction. Lines in which the spaces have been stretched beyond their normal width are called loose lines, while those whose spaces have been compressed are called tight lines."

To create Full-Justified texts, the main point is to know exactly the measures of each word, and to be able to draw each word exactly in a certain position. Unfortunately, VFP does not bring thiese possibilities natively. Yes, I know we have TXTWIDTH and FONTMETRIC(6), but they are not that accurate. A good but not beautiful solution was to use some monospace fonts, like Courier New or Lucida Console, that every character has the same measures.

So, if we wanted to use any fonts, one of the few options was to use the RTF Active-X control, or to use an OLE Word object in a VFP form.

With the GdiPlus-X library, from now on you can also draw Full Justified texts in a very easy way too.

GDI+ originally allows to draw texts in three String Format Alignments: Left, Center and Right. In these last years, I've noticed that it's a very common request from VFP developers the ability to draw texts in FullJustified mode.


To draw Full-Justified strings we need to have the accurate measurements of each of the words in a paragraph, and draw each word individually in a calculated position. Well, no need to say that GDI+ provides the needed tools for the task. So, we added a new method to the Graphics class of the GdiPlus-X library, DRAWSTRINGJUSTIFIED.

Maybe you find that the natural choice would be to add a new StringFormat Alignment fot FullJustifying purposes, and let the method "DrawString" deal with the text and the received parameters and draw. But we believe that the original library, GdiPlus.dll will receive some updates in the future, and MS can possibly include a specific "StringFormat.Alignment" for our case. So, we found the best solution would be to create a new method, with a different name. The usage is very similar to the original "DrawString":


MethodDrawStringJustified(tcString, toFont as xfcFont, toBrush as xfcBrush, toRectangle as xfcRectangle)

PARAMETERS

tcStringCharacter, String to Draw
toFontObject, Font that defines the text format of the string.
toBrushObject, Brush that determines the color and texture of the drawn text.
toRectangleObject, Rectangle structure that specifies the location of the drawn text.


HOW IT WORKS

Basically, DrawStringJustified receives the 4 parameters above, very similar to DrawString. But intead of drawing the whole text in one time, this function needs to make some calculations in order to know where exactly each word from the string will be drawn. It starts by populating an array of words and the calculated measures of each word, using GdipMeasureString. Then, calculates how many words will fit on each line. Next step is to calculate the resulting space between the words of the related line. After collecting all information needed, we draw each word at a time, at the calculated position.

For maximum performance, we used direct API calls to gdiplus.dll for the main process, measuring and drawing each string. I did some tests, and the difference is huge, about 5 times faster.

VERY IMPORTANT - READ THIS !

All samples below require that you have the latest PLANNED RELEASE, 0.08A. It's a little bit hidden at codeplex, so I'm putting below the link for direct downloading:

http://www.codeplex.com/VFPX/Release/ProjectReleases.aspx?ReleaseId=1711

TIME TO PLAY

1 - Draw Full-Justified strings in image files

The PRG below shows how to draw a text in 4 ways, left, centered, right and full justified, just like the picture above, and saves he image to a file.

** Program: FullJustCode.prg
** Sample program that draws text in 4 modes:
** 1 - Left Aligned
** 2 - Centered
** 3 - Right Aligned
** 4 - Full Justified

* The code performs the following actions:
* Creates a String
* Draws text in 4 modes and shows the results
* Locate and load GdiPlus-X
DO LOCFILE("System.App")
LOCAL lcText AS CHARACTER
TEXT TO m.lcText NOSHOW
GDIPlusX is a set of VFP 9.0 class libraries that wrap the 603 GDI+ Flat API functions of GDIPlus.dll.
The library currently consist of 83 VFP classes and 1,146 methods. The project is still under development so not all classes have been completed and several of the classes/methods are still being tested.
ENDTEXT

WITH _SCREEN.SYSTEM.Drawing

    * Create Image
    LOCAL loBMP AS xfcBitmap
    m.loBMP = .BITMAP.New(400, 600)

    * Create a Graphics object to be able to draw on image
    LOCAL loGfx AS xfcGraphics
    m.loGfx = .Graphics.FromImage(m.loBMP)

    * Fill Image with White Background color
    m.loGfx.CLEAR(.COLOR.White)

    * Create a DarkBlue Brush
    LOCAL loTextBrush AS xfcSolidBrush
    m.loTextBrush = .SolidBrush.New(.COLOR.DarkBlue)

    * Create Font Object
    LOCAL loFont AS xfcFont
    m.loFont = .FONT.New("Tahoma", 11, .FontStyle.Regular)

    * Create a StringFormat object
    LOCAL loStringFormat AS xfcStringFormat
    m.loStringFormat = .StringFormat.New()

    LOCAL lnHeight, lnWidth
    m.lnWidth  = 400
    m.lnHeight = 150

    * Draw Left Aligned Text
    m.loStringFormat.ALIGNMENT = .StringAlignment.NEAR
    m.loGfx.DrawString(m.lcText, m.loFont, m.loTextBrush, ;
          .Rectangle.New(0, 0, m.lnWidth, m.lnHeight), ;
          m.loStringFormat)

    * Draw Centered Text
    m.loStringFormat.ALIGNMENT = .StringAlignment.CENTER
    m.loGfx.DrawString(m.lcText, m.loFont, m.loTextBrush, ;
          .Rectangle.New(0, m.lnHeight + 1, m.lnWidth, m.lnHeight), ;
          m.loStringFormat)

    * Draw Right Aligned Text
    m.loStringFormat.ALIGNMENT = .StringAlignment.Far
    m.loGfx.DrawString(m.lcText, m.loFont, m.loTextBrush, ;
          .Rectangle.New(0, m.lnHeight * 2 + 1, m.lnWidth, m.lnHeight), ;
          m.loStringFormat)

    * Draw Full Justified
    m.loGfx.DrawStringJustified(m.lcText, m.loFont, m.loTextBrush, ;
          .Rectangle.New(0, m.lnHeight * 3 + 1, m.lnWidth, m.lnHeight))

    * Draw a Red Border
    m.loGfx.DrawRectangle(.PEN.New(.COLOR.Red, 1), 0, 0, 399, 599)

    * Save Image to Disk
    m.loBMP.SAVE("c:\TestAlignment.png", .Imaging.ImageFormat.Png)

    * Show Generated Text
    RUN /N explorer.EXE c:\TestAlignment.Png

ENDWITH
RETURN

2 - Draw Full-Justified strings in Forms

The easiest way to draw a Full-Justified string in a form is using the ImageCanvas object. Below is the code that you need to add to the "BeforeDraw" method if the ImgCanvas. In my previous post, Direct Draw with the Image Canvas from GdiPlus-X you'll get a tutorial showing how to work with it, and some tips.

Note that I chose to reduce the code of the GDI+ drawing part, to show that with only two lines of code you can draw your Full-Justified string with the image canvas.


LOCAL lcText AS CHARACTER
TEXT TO m.lcText NOSHOW
GDIPlusX is a set of VFP 9.0 class libraries that wrap the 603 GDI+ Flat API functions of GDIPlus.dll.
The library currently consist of 83 VFP classes and 1,146 methods. The project is still under development so not all classes have been completed and several of the classes/methods are still being tested. The Readme.htm file, included with the download, shows the current coding status of each class. As of August 31, 2006, the overall status of the library is about 97% coded and 60% tested.
ENDTEXT

WITH _SCREEN.SYSTEM.Drawing
    * Fill Image with Background color
    THIS.oGfx.CLEAR(.COLOR.White)

    * Draw the Full-Justified text
    THIS.oGfx.DrawStringJustified(m.lcText, .FONT.New("Tahoma", 12), ;
          .Brushes.Black, THIS.Rectangle)
ENDWITH


In the samples folder of the GdiPlus-X libary you'll find the form "FULLJUSTIFIED.SCX". Don't miss to run it, and play, changing the fonts, sizes, style, alignment type. But, in my opinion the most interesting feature of that sample is that you can resize the form, and the whole image will be redrawn in a flash ! Doing that you'll see how fast this routine works.


3 - Draw Full-Justified strings in reports.

This has become very easy too, after the creation of a specific report listener... but I prefer to leave this for my next post.


Maybe you have interest in the DRAWSTRINGJUSTIFIED method. To see the code, open the class xfcGraphics from the file Drawing.vcx. Look for the method "DrawStringJustified".

2012-02-22

FoxyPreviewer – HTML like formatting!

FoxyPreviewer brings another cool facility, that allows you to draw your texts in the report surface (and export it) having control on each word. Forget those old workarounds, generating images to draw some texts in your reports or even embedding RTF controls in your reports !

This brings a super cool new feature, allowing you to add some basic HTML texts to your fields. This means that you can from now on determine how EACH WORD in your field should be formatted!
See the image below, all the text is in ONE SINGLE FIELD !

FoxyPreviewer Tagged Formatting sample

How to do it ?
Very very simple:

  1. Open your report, in Edit mode
  2. Double-click the field that you want to add the tagged formatting. This will open the field properties dialog
  3. Click on the "Other" tab
  4. Click on the "Edit user data..." button
  5. Add the string "<TF>" as shown in the picture below:

FoxyPreviewer TaggedFormatting configuration


And just add the HTML code below to that field:

FoxyPreviewer TaggedFormatting

 
The search capabilities are kept, and exporting to PDF returns an excellent output as well.
Here is the list of the available TAGS that you can use:

Feature Opening Tag Closing Tag
bold <b> </b>
italic <i> </i>
underline <u> </u>
strikethru <s> </s>
text color <color=rgb/ncolor >
<c= >
</color>
</c>
text backcolor <highlight=rgb/ncolor>
<h=rgb/ncolor>
<backcolor=rgb/ncolor>
</highlight>
</h>
</backcolor>    && in FP v3
font name <fontname=”name”>
<fname=”name”>
</fontname>
</fname>
font size <fontsize=n>
<fsize=n>
</fontsize>
</fsize>
whole font style <fontstyle=”BIUS”>
<fstyle=”BIUS”>
</fontstyle>
</fstyle>
force new line (CRLF) <br>
CHR(13)
CHR(10)
CHR(13) + CHR(10)
NB: color could be stored a number with RGB()
NB: could prevent transform if '</' not in string


Special thanks to Eduard Alexandru, from Bucarest, Romania, for his essential help in this feature, help in discussions and for providing some procedures to deal with the tagged texts.
This feature still needs some tests. It is possible that you find some tags that are not being considered, please me!
Check the sample SAMPLE_TF.FRX in the latest FoxyPreviewer release to play with the new features.


2012-02-06

FoxyPreviewer email configurations

FoxyPreviewer brings 4 ways for you to send emails:

1 – MAPI - Uses the WinAPI MapiSendMail to try to send the current report as an attachment.
This setting sends a standard message, with one or more attached files and a cover note. The cover note is a dialog box that allows the user to enter a list of recipients and an optional message and other sending options. It will open a dialog email sending message, waiting for a user interaction. The message will not be sent automatically. It’s up to the user to veryfy the information ofthe message and to click at the “Send” button. 
This function tries to establish a session using the messaging system's shared session. If no shared session exists, it will fail sending the message.
This works pretty well if you have your default account set using MS Outlook Express, MS Outlook or Windows Live Mail. Definitely, it’s the easiest way to send your messages, because this way, FoxyPreviewer will use the default Email configuration of the computer.

2 - MAPI Alternative – Uses the WinAPI MapiSendDocuments to try to send the current report as an attachment.
The MAPISendDocuments function sends a standard message with one or more attached files and a cover note. The cover note is a dialog box that allows the user to enter a list of recipients and an optional message and other sending options.
This function tries to establish a session using the messaging system's shared session. If no shared session exists, it will fail sending the message.
This works pretty well if you have your default account set using MS Outlook Express, MS Outlook or Windows Live Mail. Definitely, it’s the easiest way to send your messages, because this way, FoxyPreviewer will use the default Email configuration of the computer.
Although MS says that “The use of this function is discouraged. It may be altered or unavailable in subsequent versions of Windows.”, it’s been working well in all OS’s, from WinNT to WinSeven

3 – Custom Procedure
You can use your own procedure to send the current report. use foxypreviewer property "cEmailPrg", and fill it with the name of the prg responsible for sending emails. This PRG receives as a parameter the file name of the file created that you will send as attachment. Have a look at the samples provided, the file mysendmail.prg shows how you would need to make your custom procedure.

4 – CDO
Uses the CDO2000 component included in windows 2000 and later. It allows you to send emails using a SMTP server. All settings must be accurate in order to make this work. For example, below is the configuration for a “Hotmail” or “Live” account to send emails. You may check also in Sergey Berezniker's blog for more information on how to send using MSN, YAHOO or GMAIL email messages using CDO: http://www.berezniker.com/category/topic/email


People always send messages in forums asking how they should make these configurations. In fact, they change from server to server, the best you can do is to check the Email server that you are using, and get the right configurations for SMTP Server, SMTP Port and SSL Connection.
Thanks to MK Sharma, from Foxite, I found this link, that brings some SMTP general information about several servers: http://mynokiamobile.blogspot.in/2008/01/smtp-pop3port-settings-for.html
And here is a list of servers with some common configurations for people who use Brazilian servers:
http://superlogica.com/faq/00259

Please note that I did not test any of the settings below, please make your tests!

Server SMTP adress Port(s) Use SSL
HOTMAIL / LIVE
smtp.live.com
25
TRUE
YAHOO
smtp.mail.yahoo.com
25 or 465
TRUE
GOOGLE
smtp.gmail.com
465 or 25
TRUE
AOL
smtp.aol.com
NETSCAPE
smtp.isp.netscape.com
25
MSN
smtp.email.msn.com
REDIFF
smtp.rediffmailpro.com
UOL
smtp.uol.com.br
25
TRUE
UOL smtps.uol.com.br 587 or 465 TRUE

2012-02-02

FoxyPreviewer v2.96 updates

Updates for FoxyPreviewer v2.96
http://www.foxypreviewer.com

This release brings a new cool feature, allowing you to print the same report twice in the same page.
In several cases we need to print some receipts in 2 copies. Normally these reports are small, using only half the page. If you have this situation, now you can set just one property, and FoxyPreviewer will repeat the current report in the same page, starting from the half vertical part of the page.

Currently works only when you run the report in the preview.
In the preview window, the report will look as original. The 2nd copy will be printed in the same page only when you click the "Print" button in the toolbar or Context menu.

Make your tests, running any of your reports.

Works only in Simplified mode !

DO FOXYPREVIEWER.APP
_Screen.oFoxyPreviewer.lRepeatInPage = .T.
REPORT FORM YourReport PREVIEW

Apart from this, some other minor fixes:

  • Fix in 'lExpandFields' property, now allowing exporting the "*" values correctly in PDF, XLS, RTF and HTML

  • Fix in the Preview form release, sometimes was raising file not found error on closing.

2012-01-30

Extended Messagebox() function revisited - Final version

Updated version - now without the need of external FLL

This is just an update for the original article. Originally this function needed Craig Boyd’s VFPEX.FLL to be able to update the Messagebox dialog. In this new version, I’m using VFP9 BINDEVENTS function, to bind to Windows events directly.

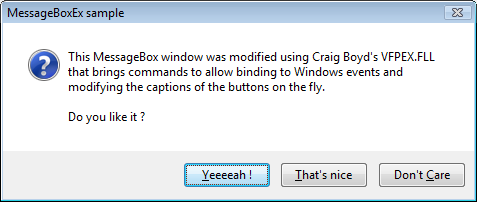
MSGBOXEX() is a simple function that allows us to customize the captions of buttons of the MESSAGEBOX(), dialog window, like in the images shown below:
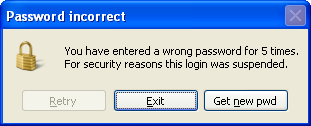


Sample 1:
lnOption = MsgboxEx( ;
   "You have entered a wrong password for 5 times." + CHR(13) + ;
   "For security reasons this login was suspended.", ; && main message
   0, ; && default icon info
   "Password incorrect", ; && title bar caption
   "\&Retry,&Exit,Get &new pwd", ; && new button captions
   "41.ico") && icon file


Sample 2:
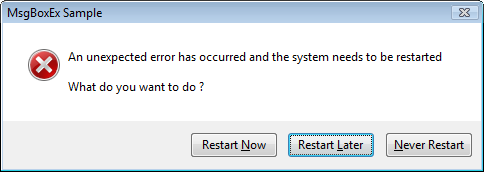
lnOption = MsgboxEx(;
   "An unexpected error has occurred and the system needs to be restarted." + ;
   CHR(13) + CHR(13) + "What do you want to do ?", ;
   "X", ;
   "MsgboxEx sample", ;
   "Restart &Now,Restart &later,&Never restart")


Sample 3:
lnOption = MsgboxEx( ;
   "Could not find the file 'Import.csv' in the selected folder.", ;
   0, ;
   "File not found", ;
   "&Abort,\&Retry,Change folder", ;
   "17.ico")


Function: MsgboxEx.prg

Description: Modifies the captions of messagebox buttons

Parameters:

  • tcCaption - the text that appears in the dialog box.

  • tnIcon - the icon sign - can be numeric, using the default messagebox() icon values or character:
       - stop sign: 16 or "x"
       - question mark: 32 or "?"
       - exclamation point: 48 or "!"
       - information: 64 or "i"

  • tcTitle - the text that appears in the title bar of the dialog box

  • tcButtons - the captions to be used in the buttons using the comma "," delimiter
    use the "&" character to determine the hotkeys to be used - eg: "option&1,option&2,option&3" - the "\" backslash can be used to show the current button disabled.

  • tcIconFile - (optional) the icon image file

Returns: The index number according to the option selected - eg. returns the value 3 if the 3rd button was selected.


Pros:
use the same dialog interface from the messagebox() function, allowing us to easilly customize existing dialog boxes.

almost the same structure of parameters of the original function

behaves correctly in all operating systems.

allows hotkeys (thanks to thiago takehana for reminding about this possibility)


Cons:
up to 3 buttons are allowed

size of buttons is limited to the original messagebox() buttons size, not allowing big sized buttons.

LPARAMETERS tcCaption, tnIcon, tcTitle, tcButtons, tcIconFile
* msgboxex.prg
* description: modifies the Captions of messagebox Buttons
* Parameters:
* tcCaption - the text that appears in the dialog box.
* tnIcon - the Icon sign
* tcTitle - the text that appears in the Title bar of the dialog box
* tcButtons - the Captions to be used in the Buttons using the comma "," delimiter
* use the "&" character to determine the hotkeys to be used - eg: "option&1,option&2,option&3"
* use a "\" to disable the Button
* tcIconFile - the Icon File to replace the default from messagebox()
* returns: the index number according to the option selected - eg. returns the value 3 if the 3rd Button was selected.
* sample:
* =MsgBoxEx("This is a common text", "!", "Window Title", "Option 1,Option 2,Option 3")

* Special thanks to:
* Herman Tan - Article: 'Centering VFP MessageBox in any Form'
* http://hermantan.blogspot.com/2008/07/centering-vfp-messagebox-in-any-form.html
* Craig boyd - Article: 'BindEvents on Steroids'
* http://www.sweetpotatosoftware.com/spsblog/2005/08/07/bindeventonsteroids.aspx

LOCAL loMsgB, lnOption
loMsgB = CREATEOBJECT("xmbMsgBoxEx")
=INKEY(.1)
lnOption = loMsgB.SendMessage(tcCaption, tnIcon, tcTitle, tcButtons, tcIconFile)
loMsgB = NULL
RETURN lnOption


DEFINE CLASS xmbMsgBoxEx AS CUSTOM
    nButtonCnt = 0
    cButtons   = ""
    nbutttype  = 0
    cIconFile  = ""
    hIcon      = 0

    PROCEDURE SendMessage
        LPARAMETERS tcCaption, tnIcon, tcTitle, tcButtons, tcIconFile
        IF VARTYPE(tntimeout) = "C" AND (PCOUNT() = 4)
            tcButtons = tntimeout
            tntimeout = 0
        ENDIF

        PRIVATE pnButtonCnt, pcButtons, pnbutttype, pcIconFile, phIcon
        This.cIconFile = IIF(EMPTY(tcIconFile),"", tcIconFile)
        This.nButtonCnt = GETWORDCOUNT(tcButtons, ",")
        This.cButtons = tcButtons
        *!* stop 16
        *!* question 32
        *!* exclamation 48
        *!* info 64
        IF (NOT EMPTY(m.tcIconFile)) OR INLIST(TRANSFORM(tnIcon), "X", "?", "!", "I")
         IF VARTYPE(tnIcon) = "C"
             tnIcon = UPPER(tnIcon)
             DO CASE
                 CASE tnIcon = "X"
                     tnIcon = 16
                 CASE tnIcon = "?"
                     tnIcon = 32
                 CASE tnIcon = "!"
                     tnIcon = 48
                 CASE tnIcon = "I"
                     tnIcon = 64
                 OTHERWISE
                     tnIcon = 0
             ENDCASE
         ENDIF
  ELSE 
   tnIcon = 0
  ENDIF 
        * check if an Icon will be shown
        * if an Icon File was passed, we need to ensure that messagebox() will
        * show an Icon, that will be changed further.

        #DEFINE image_bitmap 0
        #DEFINE image_Icon 1
        #DEFINE lr_loadfromFile 0x0010
        #DEFINE lr_defaultsize 0x0040
        This.hIcon = 0
        IF NOT EMPTY(This.cIconFile) AND ;
                (NOT (BITTEST(tnIcon, 4) OR BITTEST(tnIcon, 5) OR BITTEST(tnIcon, 6)))
            tnIcon = tnIcon + 16
            This.hIcon = xmbLoadImage(0, FULLPATH(This.cIconFile), image_Icon,;
                0,0, lr_loadfromFile + lr_defaultsize)
        ENDIF


        * this messagebox will be modified before it is shown
        LOCAL lnoption, lnIndex
        DO CASE
            CASE This.nButtonCnt = 1
                This.nbutttype = 0 && ok
            CASE This.nButtonCnt = 2
                This.nbutttype = 4 && yes / no
            CASE This.nButtonCnt = 3
                This.nbutttype = 2 && abort / retry / ignore
            OTHERWISE
        ENDCASE


        BINDEVENT( 0, 0x06, THIS, 'WndProc' )
        lnoption = MESSAGEBOX(tcCaption, tnIcon + This.nbutttype, tcTitle)
        UNBINDEVENTS( 0, 0x06 )


        LOCAL lnOffset
        lnOffset = ICASE(This.nButtonCnt = 3, 2, This.nButtonCnt = 2, 5 , 0)
        lnIndex = lnoption - lnOffset

        IF This.hIcon <> 0
            =xmbdeleteobject(This.hIcon) && clear Icon handle
        ENDIF

        RETURN lnIndex

    ENDPROC


    * Windows event handler procedure
    * MSDN WindowProc callback function
    * http://msdn.microsoft.com/en-us/library/windows/desktop/ms633573(v=vs.85).aspx
    * http://hermantan.blogspot.com/2008/07/centering-vfp-messagebox-in-any-form.html
    * Here we will make all the modifications in the Windows dialog
    PROCEDURE WndProc( th_Wnd, tn_Msg, t_wParam, t_lParam )

        IF (tn_Msg == 0x06) AND (t_wParam == 0) AND (t_lParam <> 0)

            wParam = t_lParam

            #DEFINE dlg_ctrlid_Icon 0x0014
            #DEFINE stm_setIcon 0x0170
            #DEFINE stm_setimage 0x0172
            IF NOT EMPTY(This.hIcon)
                * changing the dialog Icon
                LOCAL lhIconwindow
                lhIconwindow = xmbGetDlgItem(wParam, dlg_ctrlid_Icon)
                IF lhIconwindow <> 0
                    IF This.hIcon <> 0
                        =xmbSendMessage(lhIconwindow, stm_setIcon, This.hIcon, 0)
                    ENDIF
                ENDIF
            ENDIF


            * Set tansparency
            IF VARTYPE(_Screen.xmbMessageboxTransp) = "N"
               LOCAL lnTransp
               lnTransp = _Screen.xmbMessageboxTransp
               IF lnTransp > 30 AND lnTransp < 255 && values lower than 30 generate an almost invisible dialog!!!
                    lnTransp = MIN(INT(lnTransp), 254)
                    =xmbSetWindowLong( wParam, -20, ;
                        BITOR( xmbGetWindowLong( wParam, -20 ), 0x80000 ))
                    =xmbSetLayeredWindowAttributes( wParam, 0, lnTransp, 2 )
                ENDIF
            ENDIF

            * change Button attributes
            LOCAL N, lnOffset, lcCaption
            lnOffset = ICASE(This.nButtonCnt = 3, 2, This.nButtonCnt = 2, 5 , 0)
            LOCAL lnBtnhWnd
            FOR N = 1 TO This.nButtonCnt
                lcCaption = GETWORDNUM(This.cButtons, N, ",") + CHR(0)
                * disable current Button
                IF LEFT(lcCaption, 1) = "\"
                    lcCaption = SUBSTR(lcCaption, 2) && get the rest of the string
                    lnBtnhWnd = xmbGetDlgItem(wParam, lnOffset + N)
                    =xmbEnableWindow(lnBtnhWnd, 0)
                ENDIF

                * change the Caption
                =xmbSetDlgItemtext(wParam, lnOffset + N, lcCaption)
            ENDFOR

        ENDIF

        LOCAL pOrgProc
        pOrgProc = xmbGetWindowLong( _VFP.hWnd, -4 )
        = xmbCallWindowProc( pOrgProc, th_Wnd, tn_Msg, t_wParam, t_lParam )
    ENDPROC

ENDDEFINE 

    *********************************************************************
FUNCTION xmbSetDlgItemtext(hdlg, nidDlgItem, lpString) ********************************************************************* DECLARE INTEGER SetDlgItemText IN user32 AS xmbsetDlgItemtext ; LONG hdlg,; LONG nidDlgItem,; STRING lpString RETURN xmbSetDlgItemtext(hdlg, nidDlgItem, lpString) ENDFUNC ********************************************************************* FUNCTION xmbCallNextHookEx(hhook, ncode, wParam, LParam) ********************************************************************* DECLARE LONG callnexthookex IN user32 AS xmbcallnexthookex ; LONG hhook, LONG ncode, LONG wParam, LONG LParam RETURN xmbcallnexthookex(hhook, ncode, wParam, LParam) ENDFUNC
********************************************************************* FUNCTION xmbGetDlgItem(hdlg, nidDlgItem) ********************************************************************* * hdlg in handle to the dialog box that contains the control. * nidDlgItem in specifies the identifier of the control to be retrieved * http://msdn.microsoft.com/en-us/library/ms645481(vs.85).aspx DECLARE INTEGER GetDlgItem IN user32 AS xmbgetDlgItem ; LONG hdlg,; LONG nidDlgItem RETURN xmbGetDlgItem(hdlg, nidDlgItem) ENDFUNC ********************************************************************* FUNCTION xmbEnableWindow(hWnd, fEnable) ********************************************************************* DECLARE INTEGER EnableWindow IN user32 AS xmbEnablewindow INTEGER hWnd, INTEGER fEnable RETURN xmbEnableWindow(hWnd, fEnable) ENDFUNC ********************************************************************* FUNCTION xmbSendMessage(hwindow, msg, wParam, LParam) ********************************************************************* * http://msdn.microsoft.com/en-us/library/bb760780(vs.85).aspx * http://www.news2news.com/vfp/?group=-1&function=312 DECLARE INTEGER SendMessage IN user32 AS xmbsendmessage; INTEGER hwindow, INTEGER msg,; INTEGER wParam, INTEGER LParam RETURN xmbSendMessage(hwindow, msg, wParam, LParam) ENDFUNC ********************************************************************* FUNCTION xmbLoadImage(hinst, lpszname, utype, cxdesired, cydesired, fuload) ********************************************************************* DECLARE INTEGER LoadImage IN user32 AS xmbloadimage; INTEGER hinst,; STRING lpszname,; INTEGER utype,; INTEGER cxdesired,; INTEGER cydesired,; INTEGER fuload RETURN xmbLoadImage(hinst, lpszname, uType, cxdesired, cydesired, fuload) ENDFUNC ********************************************************************* FUNCTION xmbDeleteObject(hobject) ********************************************************************* DECLARE INTEGER DeleteObject IN gdi32 AS xmbdeleteobject INTEGER hobject RETURN xmbdeleteobject(hobject) ENDFUNC ********************************************************************* FUNCTION xmbCallWindowProc(lpPrevWndFunc, nhWnd, uMsg, wParam, LParam) ********************************************************************* DECLARE LONG CallWindowProc IN User32 ; AS xmbCallWindowProc ; LONG lpPrevWndFunc, LONG nhWnd, ; LONG uMsg, LONG wParam, LONG LParam RETURN xmbCallWindowProc(lpPrevWndFunc, nhWnd, uMsg, wParam, LParam) ENDFUNC ********************************************************************* FUNCTION xmbGetWindowLong(nhWnd, nIndex) ********************************************************************* DECLARE LONG GetWindowLong IN User32 ; AS xmbGetWindowLong ; LONG nhWnd, INTEGER nIndex RETURN xmbGetWindowLong(nhWnd, nIndex) ENDFUNC ********************************************************************* FUNCTION xmbSetWindowLong(nHWnd, nIndex, nNewVal) ********************************************************************* DECLARE INTEGER SetWindowLong In Win32Api ; AS xmbSetWindowLong ; INTEGER nHWnd, INTEGER nIndex, INTEGER nNewVal RETURN xmbSetWindowLong(nHWnd, nIndex, nNewVal) ********************************************************************* FUNCTION xmbSetLayeredWindowAttributes(nHWnd, cColorKey, nOpacity, nFlags) ********************************************************************* DECLARE INTEGER SetLayeredWindowAttributes In Win32Api ; AS xmbSetLayeredWindowAttributes ; INTEGER nHWnd, STRING cColorKey, ; INTEGER nOpacity, INTEGER nFlags RETURN xmbSetLayeredWindowAttributes(nHWnd, cColorKey, nOpacity, nFlags)


History:
2009-10-19 Extended Messagebox function original version (change captions)
2009-10-23 Extended Messagebox function updated, allowing icon change and disabling buttons
2012-01-30 Updated, no need of external FLL library

2014-03-14 Updated, fix that was not showing the custom icon in some situations


2011-12-07

FoxyPreviewer major update

Info for FoxyPreviewer v2.88.
It brings some minor fixes, but this time a major, jumbo change:

That brings some benefits, like:
- no more need to distribute reportpreview.app and reportoutput.app
- easy debugging, because all the needed files are in the same module (with debuginfo)
- no more need to deal with nonupdated systems. lots of users reported issues, but the source was the report*.app wrong (old) files
- ensure the foxypreviewer initialization will be done using the correct procedures
- a significant increase of speed running the reports and previews

This change meant only 200kb in the app, because most of the needed files were already in foxypreviewer.app and will solve the issue that lots of people had, with wrong report*.app files in their clients.
After this becomes stable, and tested by a considerable quantity of users, i'll publish a separate version of the app, without the debuginfo, to make it 50% smaller.

If for any reason someone wants to keep using the reportpreview.app and reportoutput.app files to render other reports, there should be no problems.
If you use the reportbuilder.app or use report listeners for other purposes, than you should not remore the app files.

I know this change may bring some problems, so please, i'm asking to you to test it in your environments, and specially with your exes. hopefully this will bring many benefits to us. please let me know how that goes. if you find some issues, please provide as much details that you can, so that i can reproduce the issue and upload a fix.

You can get the latest versions directly from here:
http://www.foxypreviewer.com